Paiza Engineering Blog

Engineering blog of browser-based web development environment PaizaCloud Cloud IDE ( https://paiza.cloud/ ), online compiler and editor Paiza.IO( https://paiza.IO/ )

Chrome85 is stopping to send URL path as HTTP Referer field

f:id:paiza:20201002144505p:plain

(Japanese article is here)

f:id:paiza:20151217152725j:plainHi, I'm Tsuneo([twitter:@yoshiokatsuneo]).

Now, the latest Chrome is stopping to send the URL path as HTTP Referer on cross-domain access.

If you analyze access to your web site, you can not know which article leads the user to your site.

Beginning

We have a blog as our own media to lead to our web service. And, we are monitoring the reference URLs to our web service.

We happen to nice that the more and more reference is from the blog top page, and less and less reference from each article URLs.

Chrome 85

From our access logs, it looks like the change happens only on Chrome.

And, we noticed that the default "Referrer Policy" is changed from no-referrer-when-downgrade to strict-origin-when-cross-origin on Chrome85.

For example, the reference URL "https://paiza.hatenablog.com/entry/2020/10/01/140612" is stripped to "https://paiza.hatenablog.com/" .

www.chromestatus.com

But, actually, when I test on Chrome85 my machine, the setting was "no-referrer-when-downgrade", yet. It looks that the setting is changing gradually.

How to see the Referrer Policy

We can see that what URL is sent as Referer on the cross-domain link.

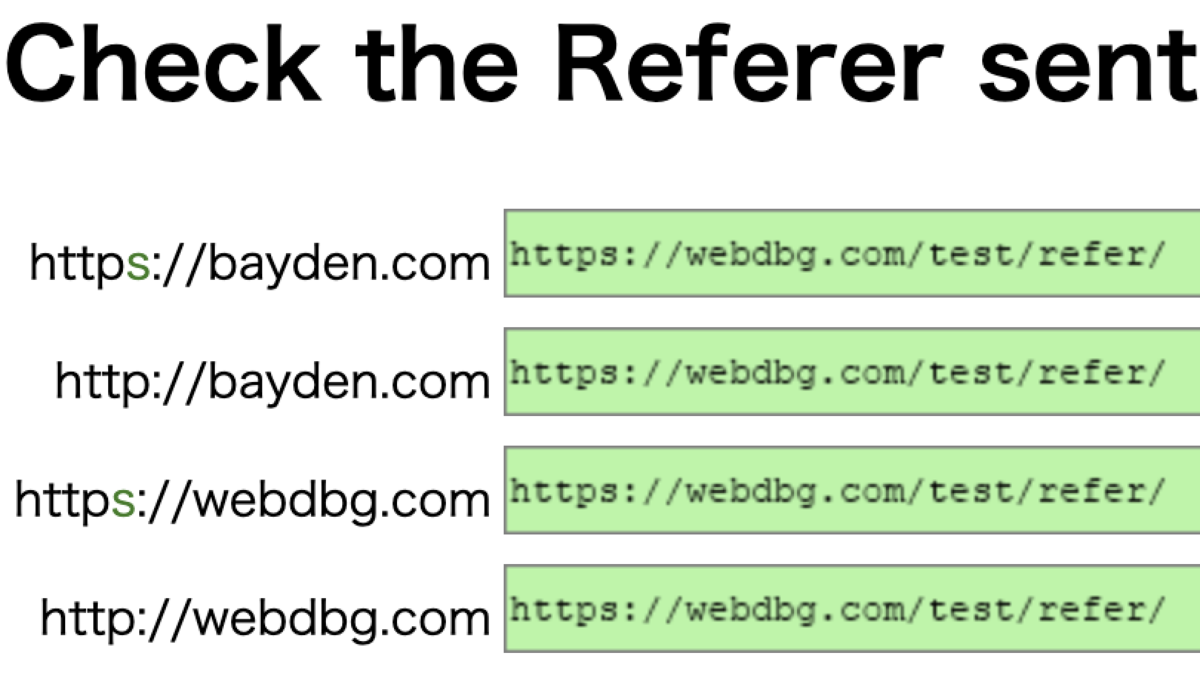
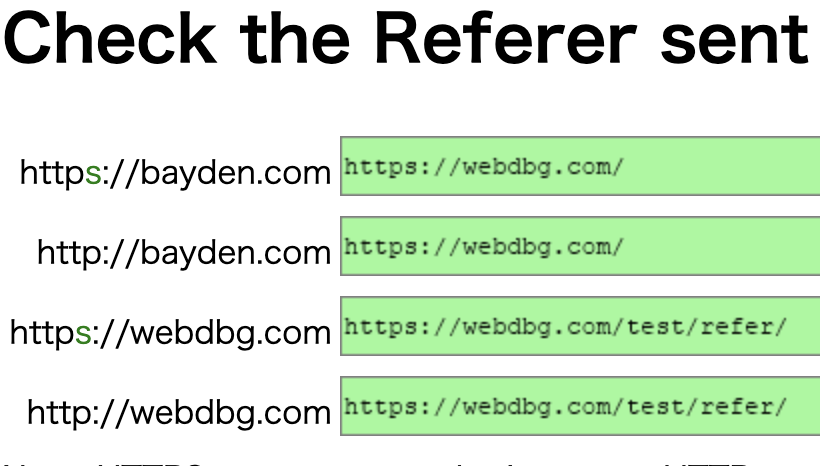
https://webdbg.com/test/refer/

If the first green box has a URL with the path, your Chrome has "no-referrer-when-downgrade" as the Referrer Policy.

f:id:paiza:20201002143005p:plain
URL with path(no-referrer-when-downgrade)

If the first green box has a URL without the path like below, your Chrome has the new "strict-origin-when-cross-origin" settings like below.

f:id:paiza:20201002142849p:plain
URL without path(strict-origin-when-cross-origin)

You can also see the Referrer-Policy on Chrome developer tool, network tab.

f:id:paiza:20201002143238p:plain

Why is the "Referrer Policy" changed ?

The Referrer Policy is changed because of privacy and security concerns.

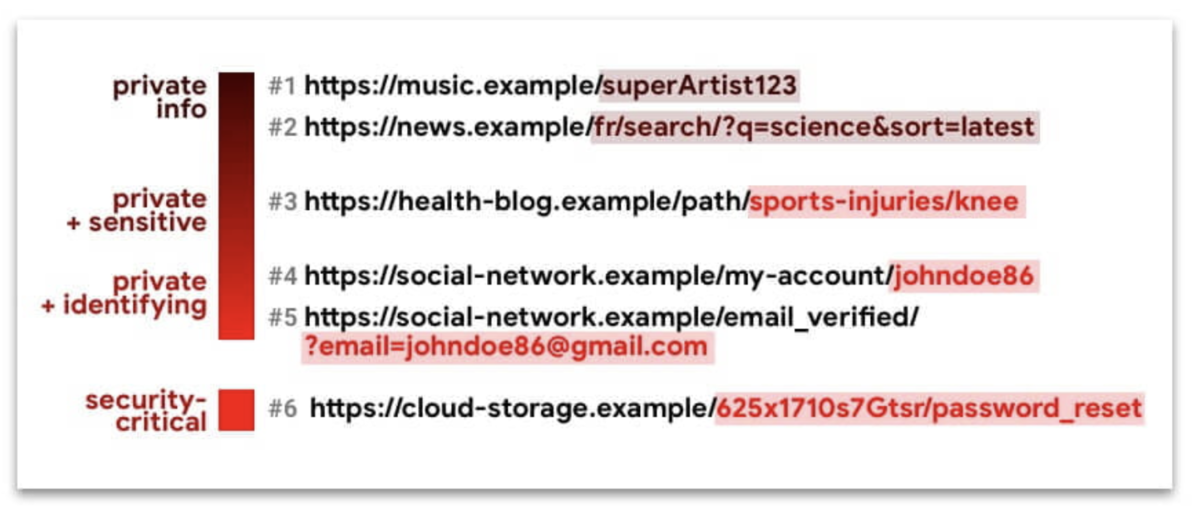
The Referer URL may contain search keywords, account ID, e-mail address, or other IDs, and the information may be sent to the linked site as "Referer".

web.dev

f:id:paiza:20201002143341p:plain
(from https://web.dev/referrer-best-practices/)

Nowadays, security and privacy are getting more critical than before. So, other browsers may change the settings as Chrome does.

Current Referrer Policy deployment status

How many Chrome85 have new "strict-origin-when-cross-origin", at now ?

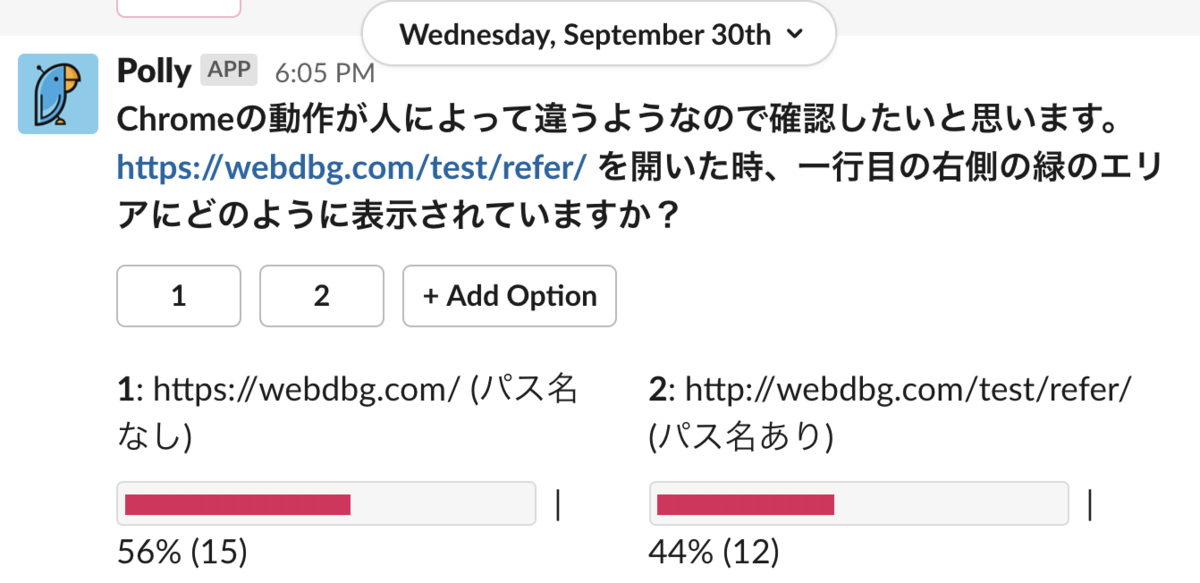
At first, I created a poll at Slack. It looks more than half have the new settings.

f:id:paiza:20201002143535p:plain

Also, from the access logs to our web sites, the percentage of Referer from the top page is growing from less than 10% to around 20% on 8th/Sep, and more than 50% on 29th/Sep or later.

Solution

If you can change the HTTP header or the HTML meta tag, you can change the Policy Referrer settings.

HTTP header(Policy-Referrer) settings

You can change Policy-Referrer HTTP response header field. On nginx, you can change the configuration file like below.

add_header 'Referrer-Policy' 'no-referrer-when-downgrade';

meta tag(name=referer) settings

You can also change using the HTML meta tag like below.

<meta name="referrer" content="no-referrer-when-downgrade"/>

Chrome settings

You can also change on Chrome settings by putting "chrome://flags/#reduced-referrer-granularity" on the URL bar for testing. By enabling the settings, Chrome does not send pathname on the URL. By disabling the settings, Chrome sends pathname on the URL.

f:id:paiza:20201002153758p:plain

About Safari

On Safari 13 introducing ITP2.3, the access from the domain classified as tracker does not contain the path on Referer.

webkit.org

Summary

The new Chrome85 is gradually stopping to send a URL path on Referer on cross-domain link, and it can cause huge impact on your web marketing. I recommend checking your settings on web sites, access logs, or analysis tools.


With「PaizaCloud Cloud IDE」, you can flexibly and easily develop your Web application or server application, and publish it, just in your browser. https://paiza.cloud


PHP+MySQL Todo List tutorial - How to create PHP todo app with MySQL database in browser with PaizaCloud Cloud IDE

f:id:paiza:20180925115954p:plain
(English article is here)

f:id:paiza:20151217152725j:plainHello I'm Tsuneo!(@)

Are you writing codes in PHP?

PHP is a programming language for web development. PHP is released in 1995, when the Internet just starts spreading.

Now, PHP is widely used. For example, Facebook or WordPress is written in PHP. As it is widely used for web development, there are many opening job positions for PHP.

But, to develop PHP application in practice, you need to install and set up PHP or databases. These installations and setting up can be frustrating. Just following the installation instruction does not work or cause errors because of OS, versions, other software dependencies, etc.

Also, if you publish the service, feedback from your friends or others motivates you. However, this requires "deployment" of the service. The "deployment" also frustrates us...

So, here comes PaizaCloud Cloud IDE, a browser-based online web and application development environment.

As PaizaCloud have PHP application development environment, you can just start coding for the PHP application program in your browser.

And, as you can develop in the cloud, you can just run the PHP application on the same machine without setting up another server and deploying to it.

Here, we develop a Todo List application using PHP7.2 and MySQL on the PaizaCloud Cloud IDE.

Following the instruction below, you'll create and run the PHP application just in 10 minutes.

About PHP

Before PHP, Web development was only for the geeks who can handle Perl or CGI, magically. It is not for the beginner or creators who actually want to create services in a timely manner.

PHP enables us to develop web service just by embedding PHP code in the simple HTML file. It makes many people build their own web service. At some point, PHP is almost synonym of the web development.

There is data that about 30% of websites are built on WordPress with PHP(Historical trends in the usage of content management systems, September 2018), and about 80% of websites use PHP. (Usage Statistics and Market Share of Server-side Programming Languages for Websites, September 2018) PHP can be the one of the most used languages for web development.

f:id:paiza:20180925121954p:plain

As we have more language or frameworks for web development, like Ruby on Rails. PHP may have some bad reputations like "slow" or "obsoleted".

But, actually, PHP is continuously evolving. Now, PHP is getting faster, with modern features like classes. A full stack modern PHP framework Laravel is getting popular in the web development.

Getting started with PaizaCloud Cloud IDE

So, here is the website of PaizaCloud Cloud IDE.

https://paiza.cloud/

Just sign up with email and click a link in the confirmation email. You can also sign up with GitHub or Google.

Create new server

Let's create a new server for the development workspace.

f:id:paiza:20171214154558p:plain

Click "new server" to open a dialog to set up the server.

Here, you can choose "PHP", "phpMyAdmin", and "MySQL", and click "New Server" button.

f:id:paiza:20171214154330p:plain

Just in 3 seconds, you'll get a browser-based development environment for PHP and MySQL.

You'll see editor or browser windows in the page, but we can close those for now.

Getting started with PHP

Now, let's run and show some PHP code.

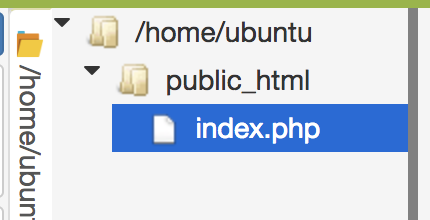
On the left-side of PaizaCloud, you can see a file management view. There is a file "public_html/index.php", so double-click to open it.

f:id:paiza:20180925120647p:plain

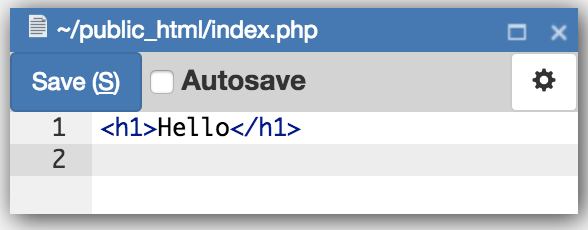
The file contains default code. Remove and replace with the following text.

public_html/index.php:

<h1>Hello</h1>

f:id:paiza:20180925174909p:plain

After the editing, click "Save" button or type "Command-S", or "Ctrl-S" to save the file.

Then, open the file in the browser on PaizaCloud.

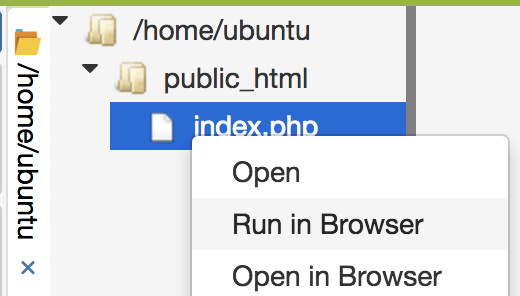
On the file management view, right-click the "public_html/index.php" file to show the context menu. Choose "Run in Browser". (Or, click the browser icon on the left side to open browser view, and type "http://localhost/~ubuntu/" in the URL bar on the browser.)

f:id:paiza:20180925175120p:plain

f:id:paiza:20180925120909p:plain

You see the text large "Hello". The text is just handled as HTML file.

Next, let's write some PHP code, edit the "public_html/index.php" file like below.

<h1>Hello</h1>
<?php
    echo 'Hello ' . 'PHP';
?>

f:id:paiza:20180925174841p:plain After the editing, click "Save" button or type "Command-S", or "Ctrl-S" to save the file.

On PHP, we embed the PHP code in the HTML file. To embed the PHP code, write the PHP code between "<?php" and "?>". Here, we use "echo" command to output a string. The string is concatenated using "'Hello ' . 'PHP'", as "." operator concatenates the strings.

So, reload the browser view to update the web page. (Or, if you close the browser view, on the file management view, right-click the "public_html/index.php" file to show the context menu, and choose "Run in the Browser". Or, click the browser icon on the left side to open browser view, and type "http://localhost/~ubuntu/" in the URL bar on the browser.)

f:id:paiza:20180925121040p:plain

Now, you see a text "Hello PHP", on the browser view. The PHP code was successfully run. As this, the output of the PHP code can be seen as HTML.

Note that we can also write the PHP code on using "<?=" syntax so that we can output the PHP output with more simple code.

<h1>Hello</h1>
<?=
    'Hello ' + 'PHP';
?>

Let's try to calculate and output by changing the code, like "1+2", "3*3", "2**10"(10th power of 2).

Create database

You'll already have a MySQL server running because you checked it on the server setting. But if not, you can always manually start like:

$ sudo systemctl enable mysql
$ sudo systemctl start mysql

On PaizaCloud Cloud IDE, you can install packages on root privilege.

Next, create a database for the application. Here, we create a database "mydb" using "mysql" command.

On PaizaCloud Cloud IDE, you can use PaizaCloud's "Terminal" application to run the commands in your browser.

Let's click the "Terminal" button at the left side of the page.

f:id:paiza:20171214154805p:plain

Now, the "Terminal" application launch.

Type the command below to create the "mydb" database.

$ mysql -u root
create database mydb;

f:id:paiza:20180216010049p:plain

You created the database.

Create table

Next, let's create a table in the database.

On the terminal view, run the commands below to create a "todos" table.

$ mysql -u root mydb;
create table todos(id int auto_increment primary key not null, name text);
exit

The table is created.

Using phpMyAdmin

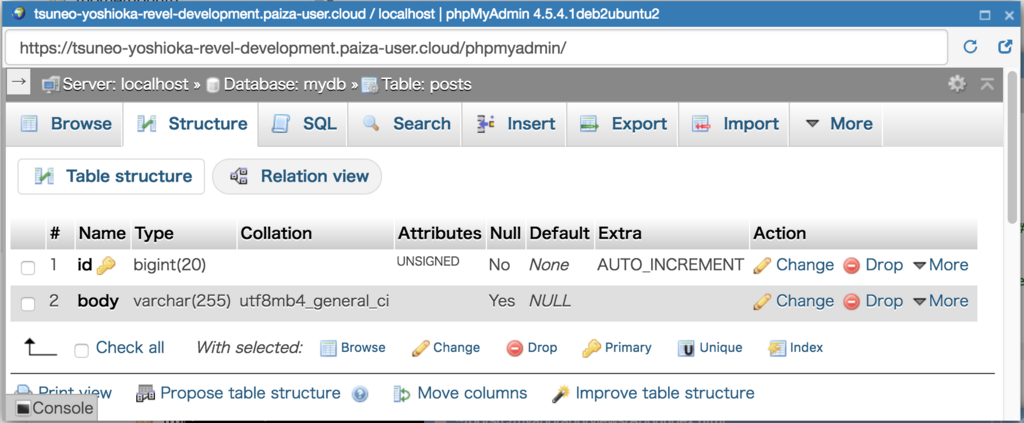
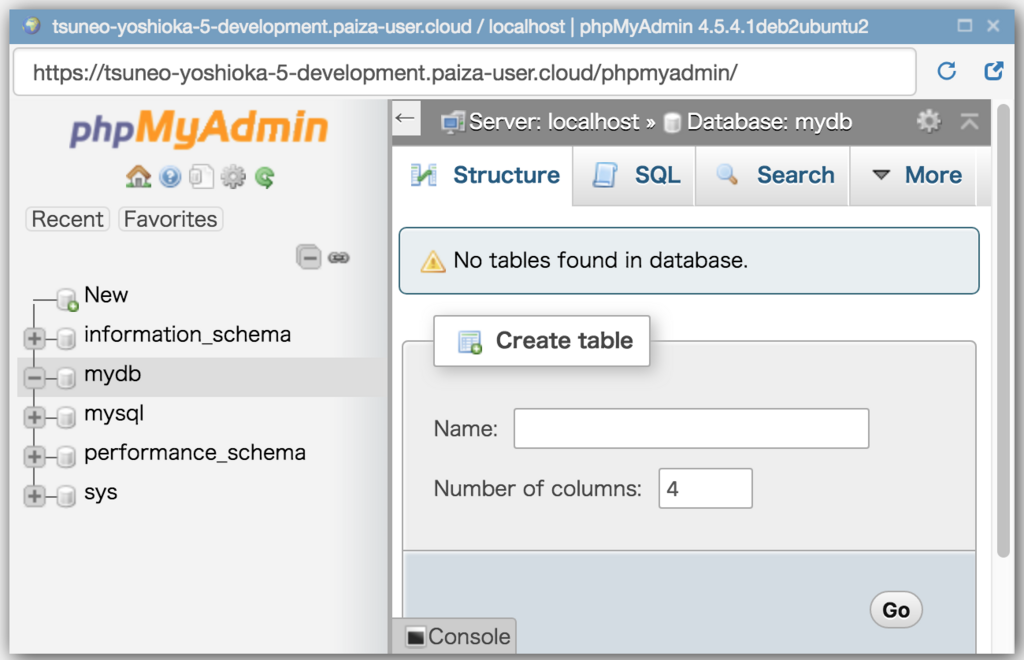
We can browse the database table using phpMyAdmin, a web-based database management tool.

On PaizaCloud, open a browser(in browser) and type "http://localhost/phpmyadmin" to the URL field.

f:id:paiza:20180216010802p:plain

Here, we can show or edit the database. It is helpful if we see the database when developing the web application.

Create Todo list application

Now, let's create a Todo list application.

Open and edit the "public_html/index.php" like below.

<?php
    $pdo = new PDO("mysql:host=localhost;dbname=mydb;charset=utf8","root","");

    if(isset($_POST['submit']) ){
        $name = $_POST['name'];
        $sth = $pdo->prepare("INSERT INTO todos (name) VALUES (:name)");
        $sth->bindValue(':name', $name, PDO::PARAM_STR);
        $sth->execute();
    }elseif(isset($_POST['delete'])){
        $id = $_POST['id'];
        $sth = $pdo->prepare("delete from todos where id = :id");
        $sth->bindValue(':id', $id, PDO::PARAM_INT);
        $sth->execute();
    }
?>

<!DOCTYPE HTML>
<html lang="ja">
<head>
    <title>Todo List</title>
    <link rel="stylesheet" href="//fonts.googleapis.com/css?family=Roboto:300,300italic,700,700italic">
    <link rel="stylesheet" href="//cdn.rawgit.com/necolas/normalize.css/master/normalize.css">
    <link rel="stylesheet" href="//cdn.rawgit.com/milligram/milligram/master/dist/milligram.min.css">
</head>

<body class="container">
    <h1>Todo List</h1>
    <form method="post" action="">
        <input type="text" name="name" value="">
        <input type="submit" name="submit" value="Add">
    </form>
    <h2>Current Todos</h2>
    <table class="table table-striped">
        <therad><th>Task</th><th></th></therad>
        <tbody>
<?php
    $sth = $pdo->prepare("SELECT * FROM todos ORDER BY id DESC");
    $sth->execute();
    
    foreach($sth as $row) {
?>
            <tr>
                <td><?= htmlspecialchars($row['name']) ?></td>
                <td>
                    <form method="POST">
                        <button type="submit" name="delete">Delete</button>
                        <input type="hidden" name="id" value="<?= $row['id'] ?>">
                        <input type="hidden" name="delete" value="true">
                    </form>
                </td>
            </tr>
<?php
    }
?>
        </tbody>
    </table>
</body>
</html>

After the editing, click "Save" button or type "Command-S", or "Ctrl-S" to save the file.

Let's see the code.

On "$pdo = new PDO()", create a PDO object to use database. On the parameter, set MySQL server name("localhost"), database name("mydb"), username("root") and password("").

"isset($_POST['submit'])" test whether the code is run when the "Add" button is clicked, as the "Add" button form have a submit form with name "submit". Set the name of the todo to "$name" by fetching a value of the submitted text input form with name "name" as "$_POST['name'];".

On the "if" clause, create and run the SQL to insert the data into the database. To do that, we use prepare(), bindValud(), and execute() function of the PDO object. "prepare()" is to set the SQL to manipulate the database, here we use "INSERT INTO todos" syntax to insert the row to the database. "bindValue()" is to replace the placeholder(":NAME") on the SQL with the value. By not directly writing SQL with value, we can safely escape the value on the SQL statement. Then, "execute()" to run the SQL command.

"if(isset($_POST['delete']))" is the clause for deleting the todo item. As the "Delete" button have a hidden input field with the name "delete", the condition is true when the todo item needs to be deleted. Retrieve the id of the todo as "$_POST['id'];", and run SQL statement "DELETE FROM todos" to delete the todo item with the id.

On the ”<head>" tag, load stylesheets for a simple CSS framework "milligram" using "<link>" tag.

On the "<body>", create an input form to add the item. Create a text input field with the name "name", and a submit form with the name "submit".

Show the todo list using "<table>" tag. "table" and "table-striped" class is a milligram class name to beautify the table.

Retrieve the table using PHP code inside "<?php" and "?>". "prepare("SELECT * FROM todos")" is a SQL to retrieve the todo list.

On "foreach($sth as $row)", scan all the row on the todos table by setting each row to "$row" variable. On each table row, output todo item by using "<?=" tag and "$row['name']" todo item value. As the value may contain HTML tags, we need to escape the value using htmlspecialchars() to avoid security issues.

Then, on each table row, add a form with "delete" button, and hidden input field with value "$row['id']" to distinguish each item.

Don't forget to add "<?php } ?>" to close the "foreach".

Run the application

Now, we wrote all the code. Let's see.

Reload the browser view to update the web page. (Or, if you close the browser view, on the file management view, right-click the "public_html/index.php" file to show the context menu, and choose "Run in the Browser". Or, click the browser icon on the left side to open browser view, and type "http://localhost/~ubuntu/" in the URL bar on the browser.)

We see the "Todo List" page with the empty task.

Let's add or delete the tasks.

f:id:paiza:20180925175017p:plain

It works! We successfully created the Task List application with PHP and MySQL!

Note that on PaizaCloud free plan, the server will be suspended. To run the bot continuously, please upgrade to the BASIC plan.

Summary

With PaizaCloud Cloud IDE, we created a PHP application with MySQL database just in your browser, without installing or setting up any development environments. Now, let's create your own Ruby on Rails application!


With「PaizaCloud Cloud IDE」, you can flexibly and easily develop your web application or server application, and publish it, just in your browser. https://paiza.cloud


Creating a simple 3D online multiplayer battle game using JavaScript and Node.js

f:id:paiza:20180621152554g:plain

Play it!

(Japanese article is here)

f:id:paiza:20151217152725j:plainHello, I'm Tsuneo!([twitter:@yoshiokatsuneo])

Do you like online multiplayer battle games?

With the online multiplayer game, we can have fun with friends, or anyone in the world!

Now, 3D online battle royal games like PUBG or Fortnite is also getting popular.

How about creating the 3D online multiplayer battle game?

It used to be difficult to create online multiplayer games as it requires server program, client program with network programming and 3D programming with many libraries, frameworks, or even languages.

However, now, as we can build all of those just with JavaScript, it is getting easier to build the 3D online multiplayer games!

So, in this article, we'll build a 3D online multiplayer battle game with JavaScript like below! (And yes, as it runs in the browser, we can run it on both PC and smartphones.)

f:id:paiza:20180621141501g:plain

Play it!

Development Environment

We'll build the game using Node.js(Server Side JavaScript), Three.js(for WebGL), and Socket.IO(for networking).

While it is getting easier to build, to develop applications in practice, you need to install and setup Node.js and related commands or packages. These installations and setting up can be frustrating. Just following the installation instruction does not work or cause errors because of OS, versions, other software dependencies, etc.

Also, if you publish the service, feedback from your friends or others motivate you. But, this requires "deployment" of the service. The "deployment" also frustrates us...

So, here comes PaizaCloud Cloud IDE, a browser-based online web and application development environment.

As PaizaCloud have Node.js application development environment, you can just start coding for the Node.js application program in your browser.

And, as you can develop in the cloud, you can just run the Node.js application on the same machine without setting up another server and deploying to it.

Here, at first, we'll create a 2D online multiplayer battle game, and evolve it to a 3D online multiplayer game.

Following the instruction below, you'll build and run the 3D online multiplayer game just in about 1 hour.

You can play the 3D online multiplayer game here .

Source code is available on GitHub.

Getting started with PaizaCloud Cloud IDE

Let's start!

Here is the website of PaizaCloud Cloud IDE.

https://paiza.cloud/

Just sign up with email and click a link in the confirmation email. You can also sign up with GitHub or Google.

Create new server

Let's create a new server for the development workspace.
f:id:paiza:20171214154558p:plain

Click "new server" to open a dialog to set up the server. Just click "New Server" button in the dialog without any settings.
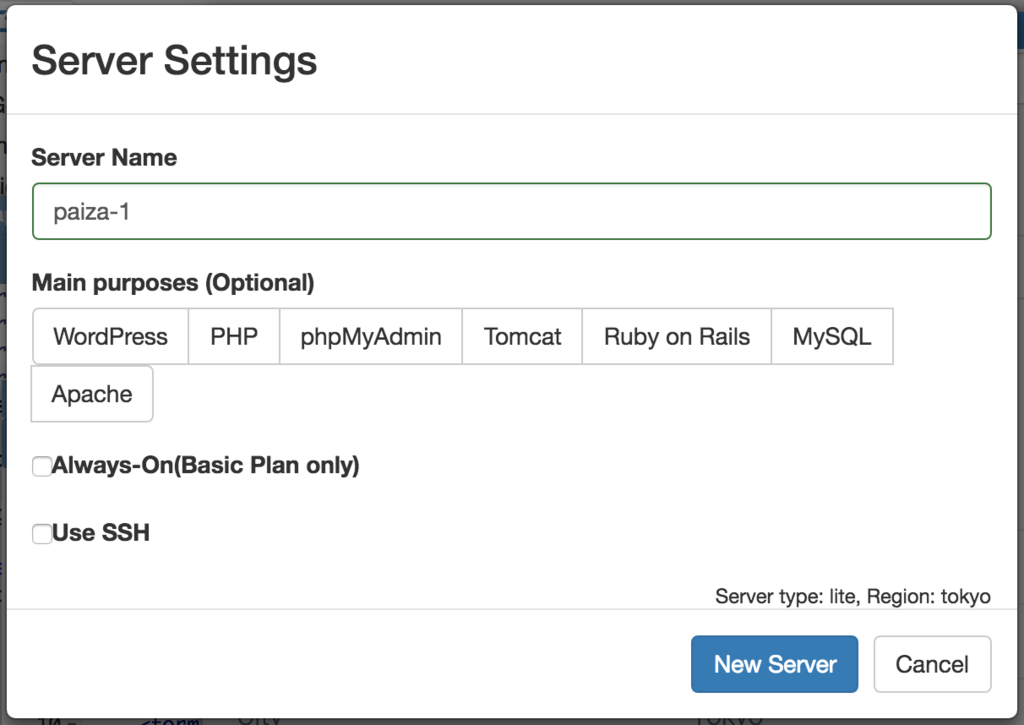
f:id:paiza:20171219143410p:plain

Just in 3 seconds, you'll get a browser-based online development environment for Node.js development.

f:id:paiza:20180116171931p:plain

Create a project

So, let's create the online multiplayer battle game using Node.js.

At first, to create the Node.js application, we use "npm init" command.

On PaizaCloud, you can use a Terminal application in the browser to run the command.

Click "Terminal" button at the left side of the PaizaCloud page.

f:id:paiza:20171214154805p:plain

The Terminal launched. Type the command "npm init", and type enter key. You get the prompt "package name:", so type your application name like "game-app" or "music-app".

$ npm init
...
package name: (ubuntu) myapp
...

f:id:paiza:20180905144532p:plain

On the file management view at the left-side of the page, we see the file "package.json" created. The "package.json" is the file to manage Node.js packages used on the application.

f:id:paiza:20180607140318p:plain

To create the web application with Node.js, we'll need Express as a web application framework. So, let's install the Express package. To install Node.js package, we can use the command "npm install [PACKAGE NAME] --save".

$ npm install express --save

The directory "node_modules" is created. The directory contains the packages used by the application.

Now, let's create the Node.js program. At first, we'll create a simple program just showing a text "Hello Node.js!".

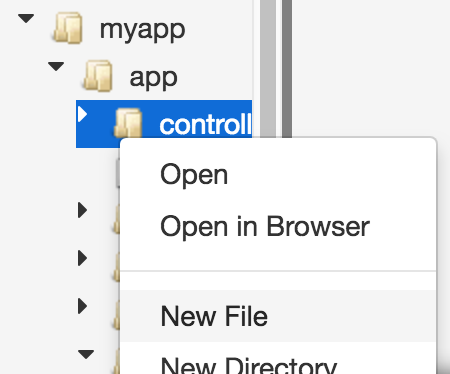
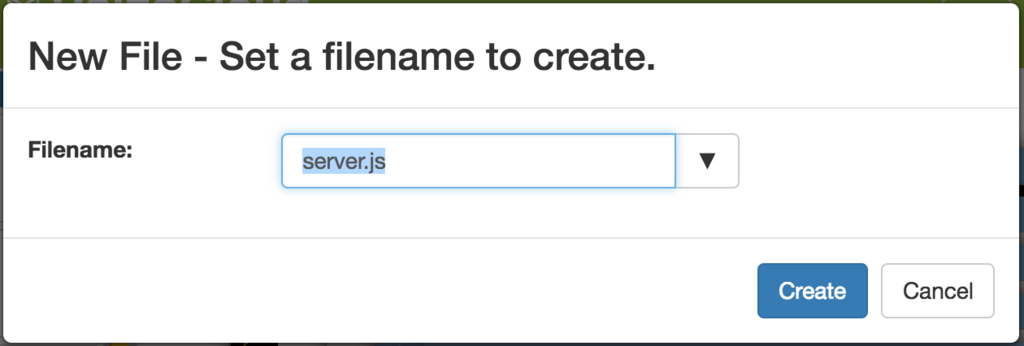
On PaizaCloud, you can create and edit the file in the browser. To create the program file, on the PaizaCloud, click "New File" button on the left-side of the page, or right-click file management view to open the context menu and choose "New File".
f:id:paiza:20171219143513p:plain

As a dialog box to put filename is shown, type a filename "server.rb" and click "Create" button.
f:id:paiza:20180626165630p:plain The file is created!

Edit the "server.js" like below.

server.js:

const express = require('express');
const app = express();

app.get('/', (req, res) => {
  res.send('Hello Node.js!');
});

app.listen(3000, () => {
    console.log("Starting server on port 3000!");
});
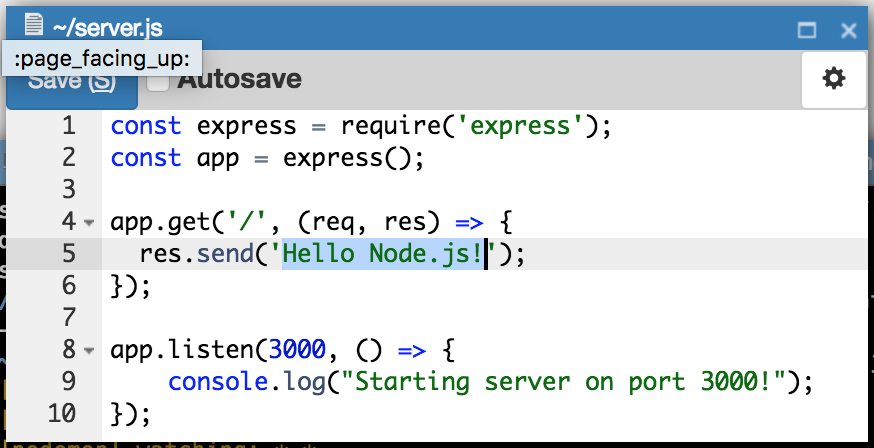
f:id:paiza:20180626165746p:plain After editing the code click "Save" button or type "Command-S" or "Ctrl-S" to save the file.

Let's see the code.

On the first and second line, it loads "express" library.

On line 4, "app.get('/'..." specify the action for the top page(URL path "/") as a function. It send a message 'Hello Node.js!' using "res.send()" function.

On line 8, "app.listen(3000,...)" run the Node.js server on port 3000.

Start Node.js

Now, you can run the application. Let's start the application.

On PaizaCloud, click "Terminal" icon to start Terminal and type "node server.js" to start the server!

$ node server.js

f:id:paiza:20180626170009p:plain

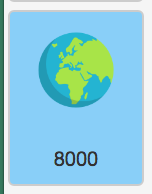
You'll get a new button with text "3000" on the left side of the page.

f:id:paiza:20171213234820p:plain

The server runs on port 3000. PaizaCloud Cloud IDE detects the port number(3000), and automatically adds the button to open a browser for the port.

Click the button, and you'll get Browser application(a Browser application in the PaizaCloud). Now, you'll see a web page with the message "Hello Node.js!", that is your application!

f:id:paiza:20180607141152p:plain

While you can run the Node.js server with "node server.js" command, it needs to restart when we change any code. So, from now, we use "nodemon" command that automatically restarts server when the program is changed.

$ npm install nodemon -g --save
$ nodemon server.js

Simple Game(Server)

Next, let's create a simple game where there are only players.

Let's build a server program. Edit the file "server.js" like below:

server.js:

'use strict';

const express = require('express');
const http = require('http');
const path = require('path');
const socketIO = require('socket.io');
const app = express();
const server = http.Server(app);
const io = socketIO(server);

const FIELD_WIDTH = 1000, FIELD_HEIGHT = 1000;
class Player{
    constructor(obj={}){
        this.id = Math.floor(Math.random()*1000000000);
        this.width = 80;
        this.height = 80;
        this.x = Math.random() * (FIELD_WIDTH - this.width);
        this.y = Math.random() * (FIELD_HEIGHT - this.height);
        this.angle = 0;
        this.movement = {};
    }
    move(distance){
        this.x += distance * Math.cos(this.angle);
        this.y += distance * Math.sin(this.angle);
    }
};

let players = {};

io.on('connection', function(socket) {
    let player = null;
    socket.on('game-start', (config) => {
        player = new Player({
            socketId: socket.id,
        });
        players[player.id] = player;
    });
    socket.on('movement', function(movement) {
        if(!player){return;}
        player.movement = movement;
    });
    socket.on('disconnect', () => {
        if(!player){return;}
        delete players[player.id];
        player = null;
    });
});

setInterval(function() {
    Object.values(players).forEach((player) => {
        const movement = player.movement;
        if(movement.forward){
            player.move(5);
        }
        if(movement.back){
            player.move(-5);
        }
        if(movement.left){
            player.angle -= 0.1;
        }
        if(movement.right){
            player.angle += 0.1;
        }
    });
    io.sockets.emit('state', players);
}, 1000/30);

app.use('/static', express.static(__dirname + '/static'));

app.get('/', (request, response) => {
  response.sendFile(path.join(__dirname, '/static/index.html'));
});

server.listen(3000, function() {
  console.log('Starting server on port 3000');
});

After editing the code click "Save" button or type "Command-S" or "Ctrl-S" to save the file.

Let's see the code.

'use strict';

Use 'use strict' to specify using the latest JavaScript version(ECMAScript6).

const express = require('express');
const http = require('http');
const path = require('path');
const socketIO = require('socket.io');
const app = express();
const server = http.Server(app);
const io = socketIO(server);

Load libraries and create objects used on the server. Here, we use libraries "express", "path", "socket.io".

const FIELD_WIDTH = 1000, FIELD_HEIGHT = 1000;

Define the size of the game screen. Here, we set both width and height to 1000.

class Player{
    constructor(){
        this.id = Math.floor(Math.random()*1000000000);
        this.width = 80;
        this.height = 80;
        this.x = Math.random() * (FIELD_WIDTH - this.width);
        this.y = Math.random() * (FIELD_HEIGHT - this.height);
        this.angle = 0;
        this.movement = {};
    }
    move(distance){
        this.x += distance * Math.cos(this.angle);
        this.y += distance * Math.sin(this.angle);
    }
};

Next, create a Player class to manage players. The Player class have instance variables "id" to identify the player, "with" and "height" for the size of the player, "x" and "y" for the position of the player, "angle" for the direction of the player, "movement" to store the player's current movement(which have forward, back, left or right boolean properties).

On the constructor, set "id" to random value, set size("width" and "height") to 80, set the player's position("x", "y") to the random value, and set "angle" to 0(right).

move() function moves the player's position with "distance" argument. We can get x-axis distance using Math.cos(), and y-axis distance using Math.sin(), and add those values to the current position.

let players = {};

Manage the list of player using "player" variable.

io.on('connection', function(socket) {
    let player = null;
    socket.on('game-start', (config) => {
        player = new Player();
        players[player.id] = player;
    });
    socket.on('movement', function(movement) {
        if(!player){return;}
        player.movement = movement;
    });
    socket.on('disconnect', () => {
        if(!player){return;}
        delete players[player.id];
        player = null;
    });
});

The Node.js server and browser(client) communicate using Socket.IO. io.on('connection',...) set the callback function when the connection is established. So, let's write codes for networking here.

socket.on('game-start',...) handle the message for starting game. Here, it creates a "Player" object and add it to the "players" variable.

socket.on('movement',...) handle the message for the player's movement. It just set the value received to the player's "movement" variable.

On socket.on('disconnect',...), callback function is called then the connection is closed(Ex: The browser is closed, the page is reloaded or changed.) Here, it removes the player from "players" variable.

setInterval(() => {
    Object.values(players).forEach((player) => {
        const movement = player.movement;
        if(movement.forward){
            player.move(5);
        }
        if(movement.back){
            player.move(-5);
        }
        if(movement.left){
            player.angle -= 0.1;
        }
        if(movement.right){
            player.angle += 0.1;
        }
    });
    io.sockets.emit('state', players);
}, 1000/30);

Use "setIntervall" to move players every 1/30 seconds. For each player on "players" variable, move the player using "move" method or change "angle" based on "movement" variable.

app.use('/static', express.static(__dirname + '/static'));

app.use() manage middlewares. Here, use "express.static" to return static files for the URL path begin with '/static'.

app.get('/', (request, response) => {
  response.sendFile(path.join(__dirname, '/static/index.html'));
});

The top page returns the file "static/index.html".

server.listen(3000, function() {
  console.log('Starting server on port 3000');
});

At last, start the Node.js server on port 3000.

Simple game(HTML)

Then, edit an HTML page for the top page "static/index.html".

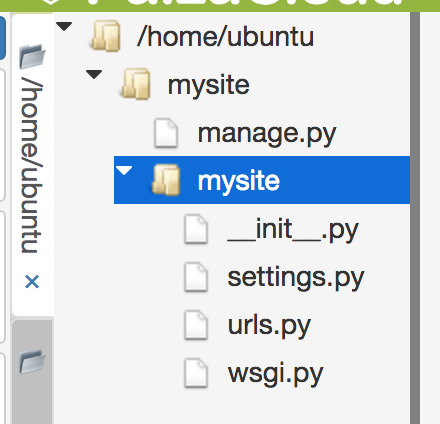
On PaizaCloud file management view, right-click home directory("/home/ubuntu") to open the context menu, choose "New Directory" to create a directory named "static". Right-click the "static" directory and choose "New File" menu to create a file "index.html".

Edit the create "static/index.html" like below.

static/index.html:

<html>
  <head>
    <title>Paiza Battle Ground</title>
    <meta name="viewport" content="width=device-width,initial-scale=1.0,minimum-scale=1.0,maximum-scale=1.0,user-scalable=no">
    <script src="/socket.io/socket.io.js"></script>
    <script src="https://ajax.googleapis.com/ajax/libs/jquery/3.3.1/jquery.min.js"></script>
  </head>
  <body style="width:100%;height:100%;margin:0;">
    <canvas id="canvas-2d" width="1000" height="1000" style="width:100%;height:100%;object-fit:contain;"></canvas>
    <img id="player-image" src="https://paiza.jp//images/bg_ttl_01.gif" style="display: none;">
    <script src="/static/game.js"></script>
  </body>
</html>

Let's see the HTML file.

    <script src="/socket.io/socket.io.js"></script>
    <script src="https://ajax.googleapis.com/ajax/libs/jquery/3.3.1/jquery.min.js"></script>

HEAD element have SCRIPT elements that load libraries: "socket.IO" and "jQuery".

    <canvas id="canvas-2d" width="1000" height="1000" style="width:100%;height:100%;object-fit:contain;"></canvas>

The canvas element is for the game screen. As the canvas can show 2D figures, we use it for drawing players. The width and height for canvas size are 1000, and the size on the page is 100%(all of the page).

    <img id="player-image" src="/static/player.gif" style="display: none;">

Set the image for the player we'll upload later on. As the image is only for drawing canvas, we set the style to "display: no" so that we don't show the image here.

    <script src="/static/game.js"></script>

At last, load a JavaScript program "static/game.js" we'll create. Add the line at the end of BODY element so that the script runs after all the HTML file is loaded.

Simple game(Player image)

Prepare a player image file("player.gif"). Here, we use a paiza logo image below.

f:id:paiza:20180620183108g:plain

On PaizaCloud, we can upload files using Drag and Drop.

Save the "player.gif" file on the desktop, and Drag and Drop to "static" directory on the file management view of PaizaCloud to upload.

f:id:paiza:20180620183145p:plain

Simple game(client)

Next, create a JavaScript program that runs in the browser(client).

On PaizaCloud, right-click "static" directory on the file management view, click "New File" to create a file "game.js".

Edit the "game.js" file like below.

static/game.js:

'use strict';

const socket = io();
const canvas = $('#canvas-2d')[0];
const context = canvas.getContext('2d');
const playerImage = $('#player-image')[0];
let movement = {};


function gameStart(){
    socket.emit('game-start');
}

$(document).on('keydown keyup', (event) => {
    const KeyToCommand = {
        'ArrowUp': 'forward',
        'ArrowDown': 'back',
        'ArrowLeft': 'left',
        'ArrowRight': 'right',
    };
    const command = KeyToCommand[event.key];
    if(command){
        if(event.type === 'keydown'){
            movement[command] = true;
        }else{ /* keyup */
            movement[command] = false;
        }
        socket.emit('movement', movement);
    }
});

socket.on('state', (players, bullets, walls) => {
    context.clearRect(0, 0, canvas.width, canvas.height);

    context.lineWidth = 10;
    context.beginPath();
    context.rect(0, 0, canvas.width, canvas.height);
    context.stroke();

    Object.values(players).forEach((player) => {
        context.drawImage(playerImage, player.x, player.y);
        context.font = '30px Bold Arial';
        context.fillText('Player', player.x, player.y - 20);
    });
});

socket.on('connect', gameStart);

Let's see the code.

const socket = io();

Connect to the server using Socket.IO. We use the "socket" variable to communicate with the server.

const canvas = $('#canvas-2d')[0];
const context = canvas.getContext('2d');

Get canvas object for the game screen on the HTML. As we need drawing context to draw canvas, get drawing context using "getContext('2d')".

const playerImage = $('#player-image')[0];

Get a player image on the IMG element from HTML.

let movement = {};

"movement" represents the player's movement. It have boolean properties "forward", "back", "left", "right".

function gameStart(){
    socket.emit('game-start');
}

gameStart() is to start the game. Here, send 'game-start' message to the server.

$(document).on('keydown keyup', (event) => {
    const KeyToCommand = {
        'ArrowUp': 'forward',
        'ArrowDown': 'back',
        'ArrowLeft': 'left',
        'ArrowRight': 'right',
    };
    const command = KeyToCommand[event.key];
    if(command){
        if(event.type === 'keydown'){
            movement[command] = true;
        }else{ /* keyup */
            movement[command] = false;
        }
        socket.emit('movement', movement);
    }
});

To move the player using a keyboard, handle 'keydown' and 'keyup' events. The key name pressed is "event.key". Convert the key name to movement properties("forward", "back", "left", "right") using "KeyToCommand" hash.

movement[command] store the key state. It is true when the key is on, and false when the key is off. Send the movement object to the server using "socket.emit()".

socket.on('state', (players) => {
    context.clearRect(0, 0, canvas.width, canvas.height);

    context.lineWidth = 10;
    context.beginPath();
    context.rect(0, 0, canvas.width, canvas.height);
    context.stroke();

    Object.values(players).forEach((player) => {
        context.drawImage(playerImage, player.x, player.y);
        context.font = '30px Bold Arial';
        context.fillText('Player', player.x, player.y - 20);
    });
});

On state.on('state',...), the specified callback function is called when the 'state' message(the player's state) is received. So, draw the player based on the state.

Clear the canvas with "clearRect()", and draw border rectangle of the game screen using "context.rect()". The functions like rect() to draw path requires "context.beginPath()" before the function, and "context.stroke()" after the function.

For each player, draw the image using "drawImage()", and write text 'Player' using "fillText()".

Run Simple game

Let's run the program.

To make sure, type Ctrl-C to exit current server.

Type "nodemon server.js" to start the server!

$ nodemon server.js

You'll get a new button with text "3000" on the left side of the page. Click the button, and you'll get Browser application(a Browser application in the PaizaCloud).

f:id:paiza:20180620183217p:plain

Now, you'll see the players! Let's move the player with arrow keys.

You can run multiple browsers to run multiple players!

If it does not run, right-click the browser and choose "inspect" menu to see the error message. Confirm that the "static/player.gif" file exists on the server.

2D game(server)

While the "Simple game" is a kind of online multiplayer game, there are only players who can only move. Next, let's make the players shoot bullets to fight each other. Also, let's add walls, and play cannot move over the player or boundary of the game board.

Let's start with the server code.

Open "server.js" and edit it like below.

server.js:

'use strict';

const express = require('express');
const http = require('http');
const path = require('path');
const socketIO = require('socket.io');
const app = express();
const server = http.Server(app);
const io = socketIO(server);


const FIELD_WIDTH = 1000, FIELD_HEIGHT = 1000;
class GameObject{
    constructor(obj={}){
        this.id = Math.floor(Math.random()*1000000000);
        this.x = obj.x;
        this.y = obj.y;
        this.width = obj.width;
        this.height = obj.height;
        this.angle = obj.angle;
    }
    move(distance){
        const oldX = this.x, oldY = this.y;
        
        this.x += distance * Math.cos(this.angle);
        this.y += distance * Math.sin(this.angle);
        
        let collision = false;
        if(this.x < 0 || this.x + this.width >= FIELD_WIDTH || this.y < 0 || this.y + this.height >= FIELD_HEIGHT){
            collision = true;
        }
        if(this.intersectWalls()){
            collision = true;
        }
        if(collision){
            this.x = oldX; this.y = oldY;
        }
        return !collision;
    }
    intersect(obj){
        return (this.x <= obj.x + obj.width) &&
            (this.x + this.width >= obj.x) &&
            (this.y <= obj.y + obj.height) &&
            (this.y + this.height >= obj.y);
    }
    intersectWalls(){
        return Object.values(walls).some((wall) => {
            if(this.intersect(wall)){
                return true;
            }
        });
    }
    toJSON(){
        return {id: this.id, x: this.x, y: this.y, width: this.width, height: this.height, angle: this.angle};
    }
};

class Player extends GameObject{
    constructor(obj={}){
        super(obj);
        this.socketId = obj.socketId;
        this.nickname = obj.nickname;
        this.width = 80;
        this.height = 80;
        this.health = this.maxHealth = 10;
        this.bullets = {};
        this.point = 0;
        this.movement = {};

        do{
            this.x = Math.random() * (FIELD_WIDTH - this.width);
            this.y = Math.random() * (FIELD_HEIGHT - this.height);
            this.angle = Math.random() * 2 * Math.PI;
        }while(this.intersectWalls());
    }
    shoot(){
        if(Object.keys(this.bullets).length >= 3){
            return;
        }
        const bullet = new Bullet({
            x: this.x + this.width/2,
            y: this.y + this.height/2,
            angle: this.angle,
            player: this,
        });
        bullet.move(this.width/2);
        this.bullets[bullet.id] = bullet;
        bullets[bullet.id] = bullet;
    }
    damage(){
        this.health --;
        if(this.health === 0){
            this.remove();
        }
    }
    remove(){
        delete players[this.id];
        io.to(this.socketId).emit('dead');
    }
    toJSON(){
        return Object.assign(super.toJSON(), {health: this.health, maxHealth: this.maxHealth, socketId: this.socketId, point: this.point, nickname: this.nickname});
    }
};
class Bullet extends GameObject{
    constructor(obj){
        super(obj);
        this.width = 15;
        this.height = 15;
        this.player = obj.player;
    }
    remove(){
        delete this.player.bullets[this.id];
        delete bullets[this.id];
    }
};
class BotPlayer extends Player{
    constructor(obj){
        super(obj);
        this.timer = setInterval(() => {
            if(! this.move(4)){
                this.angle = Math.random() * Math.PI * 2;
            }
            if(Math.random()<0.03){
                this.shoot();
            }
        }, 1000/30);
    }
    remove(){
        super.remove();
        clearInterval(this.timer);
        setTimeout(() => {
            const bot = new BotPlayer({nickname: this.nickname});
            players[bot.id] = bot;
        }, 3000);
    }
};
class Wall extends GameObject{
};

let players = {};
let bullets = {};
let walls = {};

for(let i=0; i<3; i++){
    const wall = new Wall({
            x: Math.random() * FIELD_WIDTH,
            y: Math.random() * FIELD_HEIGHT,
            width: 200,
            height: 50,
    });
    walls[wall.id] = wall;
}

const bot = new BotPlayer({nickname: 'bot'});
players[bot.id] = bot;

io.on('connection', function(socket) {
    let player = null;
    socket.on('game-start', (config) => {
        player = new Player({
            socketId: socket.id,
            nickname: config.nickname,
        });
        players[player.id] = player;
    });
    socket.on('movement', function(movement) {
        if(!player || player.health===0){return;}
        player.movement = movement;
    });
    socket.on('shoot', function(){
        console.log('shoot');
        if(!player || player.health===0){return;}
        player.shoot();
    });
    socket.on('disconnect', () => {
        if(!player){return;}
        delete players[player.id];
        player = null;
    });
});

setInterval(() => {
    Object.values(players).forEach((player) => {
        const movement = player.movement;
        if(movement.forward){
            player.move(5);
        }
        if(movement.back){
            player.move(-5);
        }
        if(movement.left){
            player.angle -= 0.1;
        }
        if(movement.right){
            player.angle += 0.1;
        }
    });
    Object.values(bullets).forEach((bullet) =>{
        if(! bullet.move(10)){
            bullet.remove();
            return;
        }
        Object.values(players).forEach((player) => {
           if(bullet.intersect(player)){
               if(player !== bullet.player){
                   player.damage();
                   bullet.remove();
                   bullet.player.point += 1;
               }
           } 
        });
        Object.values(walls).forEach((wall) => {
           if(bullet.intersect(wall)){
               bullet.remove();
           }
        });
    });
    io.sockets.emit('state', players, bullets, walls);
}, 1000/30);


app.use('/static', express.static(__dirname + '/static'));

app.get('/', (request, response) => {
  response.sendFile(path.join(__dirname, '/static/index.html'));
});

server.listen(3000, function() {
  console.log('Starting server on port 3000');
});

So, let's see the codes.

In the "Simple Game" have only one class "Player". "2D game" also have "Wall" class and "Bullet" class. As those "Player", "Wall", and "Bullet" class are objects existing on the game board. So, we create a GameObject class for common parts for those classes on the game board.

Also, for the test playing or for the case there is no other players on the game board, we create a bot player class "BotPlayer" inherited from the "Player" class.

class GameObject{
    constructor(obj={}){
        this.id = Math.floor(Math.random()*1000000000);
        this.x = obj.x;
        this.y = obj.y;
        this.width = obj.width;
        this.height = obj.height;
        this.angle = obj.angle;
    }
    ...

"GameObject" class represents objects existing on the game board. The constructor function generates "id" from a random value. "x", "y" represents the position, "width", "height" represents the size, and "angle" represents the direction of the object. Those variables can be passed as a argument of the constructor.

    move(distance){
        const oldX = this.x, oldY = this.y;
        
        this.x += distance * Math.cos(this.angle);
        this.y += distance * Math.sin(this.angle);
        
        let collision = false;
        if(this.x < 0 || this.x + this.width >= FIELD_WIDTH || this.y < 0 || this.y + this.height >= FIELD_HEIGHT){
            collision = true;
        }
        if(this.intersectWalls()){
            collision = true;
        }
        if(collision){
            this.x = oldX; this.y = oldY;
        }
        return !collision;
    }

move() of GameObject moves the object for the "distance" parameter. Use Math.cos() to get the distance in the x-direction, and "Math.sin()" to get the distance in the y-direction. It also test that the position moving to is not out of the game board by testing that the "x" is between 0 and FIELD_WIDTH - this.width, and "y" is between 0 and FIELD_HEIGHT - this.height. Also, it test that the object is not collided with walls using intersectWalls() we'll create later on.

The function returns true if moving succeeded, or move back to the original position(oldX, oldY) and return false if the object collides with walls or boundaries.

    intersect(obj){
        return (this.x <= obj.x + obj.width) &&
            (this.x + this.width >= obj.x) &&
            (this.y <= obj.y + obj.height) &&
            (this.y + this.height >= obj.y);
    }

The intersects() of GameObject test if the object collides with the other objects. As GameObject represents the rectangular object, it tests whether there are any intersections of objects for x-direction, and y-direction.

    intersectWalls(){
        return Object.values(walls).some((wall) => this.intersect(wall));
    }

The intersectWalls() of GameObject test for the collision with the all walls, and return true or false.

    toJSON(){
        return {id: this.id, x: this.x, y: this.y, width: this.width, height: this.height, angle: this.angle};
    }

The toJSON() function of the GameObject represents how to transform the object to JSON format for sending the object to the client. Here, we use "id", x", "y", "width", "height", and "angle" variables.

JSON.serialize() will use this "toJSON()" function to create the JSON string from the object.

Next, let's see the "Player" class.

class Player extends GameObject{
    constructor(obj={}){
        super(obj);
        this.socketId = obj.socketId;
        this.nickname = obj.nickname;
        this.width = 80;
        this.height = 80;
        this.health = this.maxHealth = 10;
        this.bullets = {};
        this.point = 0;
        this.movement = {};

        do{
            this.x = Math.random() * (FIELD_WIDTH - this.width);
            this.y = Math.random() * (FIELD_HEIGHT - this.height);
            this.angle = Math.random() * 2 * Math.PI;
        }while(this.intersectWalls());
    }

Player class inherits GameObject class, and have "socketId" variable for communication socket, "nickname" variable for the nickname, "health" variable for the player's health point, "bullets" for the collection of the bullets the player shot, and the "point" variable for the points. It set the initial "health" to 10, and the maxHealth to the initial "health".

The player's position is set using random value. If the position is in the wall, other position is created.

    shoot(){
        if(Object.keys(this.bullets).length >= 3){
            return;
        }
        const bullet = new Bullet({
            x: this.x + this.width/2,
            y: this.y + this.height/2,
            angle: this.angle,
            player: this,
        });
        bullet.move(this.width/2);
        this.bullets[bullet.id] = bullet;
        bullets[bullet.id] = bullet;
    }

The shoot() function of the Player class shoot bullets. Let's set the maximum number of concurrent bullets to three. If there are already three or more bullets exists, it does not shoot more bullets.

It creates the bullets objects with "new Bullets()". It set the position of the bullets to the center of the player. Also, call "player.move(this.width/2)" to move the bullet to around the edge of the player. It keeps the bullets shot to the "bullets" variable.

    damage(){
        this.health --;
        if(this.health === 0){
            this.remove();
        }
    }

The damage() of the Player class represents the action on the damage when the player was shot. It decreases the "health" by one, and remove the player if the health is zero.

    remove(){
        delete players[this.id];
        io.to(this.socketId).emit('dead');
    }

The remove() of the Player class removes the player from the "players", and notify it to the browser(client).

    toJSON(){
        return Object.assign(super.toJSON(), {health: this.health, maxHealth: this.maxHealth, socketId: this.socketId, point: this.point, nickname: this.nickname});
    }

The toJSON() of the Player represents the list of variables of the object used when the object information is sent to the browser(client). Here, we use "health", "maxHealth", "socketId", "point", and "nickname" variables in addition to the variables set on the toJSON() of GameObject class.

Next, let's see the Bullet class.

class Bullet extends GameObject{
    constructor(obj){
        super(obj);
        this.width = 15;
        this.height = 15;
        this.player = obj.player;
    }
    remove(){
        delete this.player.bullets[this.id];
        delete bullets[this.id];
    }
};

As the bullets exist on the game board, Bullet class inherits GameObject class. In the constructor function, the player shot the bullet is stored as the "player" variable.

remove() function is to remove the bullets. It removes the bullet from global "bullets" variable, and the shooter's bullets("this.player.bullets").

Next, let's see the BotPlayer class representing bot players.

class BotPlayer extends Player{
    constructor(obj){
        super(obj);
        this.timer = setInterval(() => {
            if(! this.move(4)){
                this.angle = Math.random() * Math.PI * 2;
            }
            if(Math.random()<0.03){
                this.shoot();
            }
        }, 1000/30);
    }
    remove(){
        super.remove();
        clearInterval(this.timer);
        setTimeout(() => {
            const bot = new BotPlayer({nickname: this.nickname});
            players[bot.id] = bot;
        }, 3000);
    }
};

As a bot player a kind of the player, BotPlayer class inherits Player class. In the constructor function, it moves the bot player on every 1/30 seconds using a timer. When the move() fails, it changes the direction of the player randomly. It also shoots bullets randomly.

The remove() function is called when the bot was killed. It creates a new bot after 3 seconds.

Next, the Wall class simply just inherits GameObject class.

class Wall extends GameObject{
};

Now, as all the classes are prepared, let's create the objects.

for(let i=0; i<3; i++){
    const wall = new Wall({
            x: Math.random() * FIELD_WIDTH,
            y: Math.random() * FIELD_HEIGHT,
            width: 200,
            height: 50,
    });
    walls[wall.id] = wall;
}

At first, create 3 walls. The position of the walls is set from random values. The created walls are set to global "walls" variable.

const bot = new BotPlayer({nickname: 'bot'});
players[bot.id] = bot;

Create a bot player.

io.on('connection', function(socket) {
    let player = null;
    socket.on('game-start', (config) => {
        player = new Player({
            socketId: socket.id,
            nickname: config.nickname,
        });
        players[player.id] = player;
    });
    socket.on('movement', function(movement) {
        if(!player || player.health===0){return;}
        player.movement = movement;
    });
    socket.on('shoot', function(){
        console.log('shoot');
        if(!player || player.health===0){return;}
        player.shoot();
    });
    socket.on('disconnect', () => {
        if(!player){return;}
        delete players[player.id];
        player = null;
    });
});

Set the actions for the messages sent from the browser(client).

'game-start' is the message to start the game. Create a player with the specified nickname and socket ID.

'movement' is the message to move the player. Just set it to the player's message variable.

'shoot' is the message to shoot a bullet. Just call shoot() function of the player.

'disconnect' is the event called when the socket communication is closed. Remove the player from the global player's list "players".

setInterval(() => {
    Object.values(players).forEach((player) => {
        const movement = player.movement;
        if(movement.forward){
            player.move(5);
        }
        if(movement.back){
            player.move(-5);
        }
        if(movement.left){
            player.angle -= 0.1;
        }
        if(movement.right){
            player.angle += 0.1;
        }
    });
    Object.values(bullets).forEach((bullet) =>{
        if(! bullet.move(10)){
            bullet.remove();
            return;
        }
        Object.values(players).forEach((player) => {
           if(bullet.intersect(player)){
               if(player !== bullet.player){
                   player.damage();
                   bullet.remove();
                   bullet.player.point += 1;
               }
           } 
        });
    });
    io.sockets.emit('state', players, bullets, walls);
}, 1000/30);

Next, move the bullets and players every 1/30 seconds.

For each player of the "players", move the player based on player's "movement" variable.

For each bullet of the "bullets", move the bullet. If the bullet reaches to the edge of the game board of the walls, the bullet is removed. If the bullet collides with any players, then remove the player's health using damage(), remove the bullet, and increase the player's point by one.

After the movings, send the positions and other statuses of the players, bullets, walls to the browser(client) as 'state' message.

2D game(HTML)

Next, let's create an HTML file.

Open "static/index.html", and edit the file like below.

static/index.html:

<html>
  <head>
    <title>Paiza Battle Ground</title>
    <meta name="viewport" content="width=device-width,initial-scale=1.0,minimum-scale=1.0,maximum-scale=1.0,user-scalable=no">
    <script src="/socket.io/socket.io.js"></script>
    <script src="https://ajax.googleapis.com/ajax/libs/jquery/3.3.1/jquery.min.js"></script>
  </head>
  <body style="display: flex; flex-direction: column; width: 100%; height: 100%; margin: 0;">
    <div>Paiza Battle Field</div>
    <div style="flex: 1 1; position: relative; overflow:hidden;">
        <div id="start-screen" style="width:100%; height:100%; display: flex; align-items: center; position:absolute; z-index:10;background-color:rgba(128,128,128,0.5);">
            <div style="text-align: center; width: 100%; font-size: xx-large;">
                <input type="text" name="nickname" id="nickname" placeholder="Your nickname" autofocus><br/><br/>
                <button style="font-size: xx-large;" id="start-button">Start</button>
            </div>
        </div>
        <canvas id="canvas-2d" width="1000" height="1000" style="position:absolute;width:100%;height:100%;object-fit:contain;"></canvas>
    </div>
    <img id="player-image" src="/static/player.gif" style="display: none;">
    <script src="/static/game.js"></script>
  </body>
</html>

It almost same as the "Simple Game", but it adds game starting screen with "start-screen" which have a text input field for the player.

2D版 game(client)

Next, let's change the browser(client) JavaScript code.

Open "static/game.js", and edit the file like below:

static/game.js:

'use strict';

const socket = io();
const canvas = $('#canvas-2d')[0];
const context = canvas.getContext('2d');
const playerImage = $('#player-image')[0];

function gameStart(){
    socket.emit('game-start', {nickname: $("#nickname").val() });
    $("#start-screen").hide();
}
$("#start-button").on('click', gameStart);

let movement = {};

$(document).on('keydown keyup', (event) => {
    const KeyToCommand = {
        'ArrowUp': 'forward',
        'ArrowDown': 'back',
        'ArrowLeft': 'left',
        'ArrowRight': 'right',
    };
    const command = KeyToCommand[event.key];
    if(command){
        if(event.type === 'keydown'){
            movement[command] = true;
        }else{ /* keyup */
            movement[command] = false;
        }
        socket.emit('movement', movement);
    }
    if(event.key === ' ' && event.type === 'keydown'){
        socket.emit('shoot');
    }
});

socket.on('state', function(players, bullets, walls) {
    context.clearRect(0, 0, canvas.width, canvas.height);

    context.lineWidth = 10;
    context.beginPath();
    context.rect(0, 0, canvas.width, canvas.height);
    context.stroke();

    Object.values(players).forEach((player) => {
        context.save();
        context.font = '20px Bold Arial';
        context.fillText(player.nickname, player.x, player.y + player.height + 25);
        context.font = '10px Bold Arial';
        context.fillStyle = "gray";
        context.fillText('♥'.repeat(player.maxHealth), player.x, player.y + player.height + 10);
        context.fillStyle = "red";
        context.fillText('♥'.repeat(player.health), player.x, player.y + player.height + 10);
        context.translate(player.x + player.width/2, player.y + player.height/2);
        context.rotate(player.angle);
        context.drawImage(playerImage, 0, 0, playerImage.width, playerImage.height, -player.width/2, -player.height/2, player.width, player.height);
        context.restore();
        
        if(player.socketId === socket.id){
            context.save();
            context.font = '30px Bold Arial';
            context.fillText('You', player.x, player.y - 20);
            context.fillText(player.point + ' point', 20, 40);
            context.restore();
        }
    });
    Object.values(bullets).forEach((bullet) => {
        context.beginPath();
        context.arc(bullet.x, bullet.y, bullet.width/2, 0, 2 * Math.PI);
        context.stroke();
    });
    Object.values(walls).forEach((wall) => {
        context.fillStyle = 'black';
        context.fillRect(wall.x, wall.y, wall.width, wall.height);
    });
});

socket.on('dead', () => {
    $("#start-screen").show();
});

Let's see the main difference of the code from the "Simple Game".

function gameStart(){
    socket.emit('game-start', {nickname: $("#nickname").val() });
    $("#start-screen").hide();
}

gameStart() represents the behavior for starting the game. It retrieves the nickname from the start screen, and send 'game-start' message to the server with it. It also hides the game starting screen.

$("#start-button").on('click', gameStart);

When the "start" button of the game starting screen, call the gameStart() function to start the game.

$(document).on('keydown keyup', (event) => {
    ...
    if(event.key === ' ' && event.type === 'keydown'){
        socket.emit('shoot');
    }
});

"keydown", "keyup" event handler is almost same as "Simple game", but it also handles the "space key" to shoot bullet by sending the 'shoot' message to the server.

socket.on('state', function(players, bullets, walls) {
...
    Object.values(players).forEach((player) => {
        context.fillText(player.nickname, player.x, player.y + player.height + 25);
        ...
        context.fillText('♥'.repeat(player.health), player.x, player.y + player.height + 10);
        context.translate(player.x + player.width/2, player.y + player.height/2);
        context.rotate(player.angle);
        context.drawImage(playerImage, 0, 0, playerImage.width, playerImage.height, -player.width/2, -player.height/2, player.width, player.height);
        ...
        if(player.socketId === socket.id){
            ...
            context.fillText('You', player.x, player.y - 20);
            context.fillText(player.point + ' point', 20, 40);
            ...
        }
    });
    Object.values(bullets).forEach((bullet) => {
        context.beginPath();
        context.arc(bullet.x, bullet.y, bullet.width/2, 0, 2 * Math.PI);
        context.stroke();
    });
    Object.values(walls).forEach((wall) => {
        context.fillStyle = 'black';
        context.fillRect(wall.x, wall.y, wall.width, wall.height);
    });
});

When the client receives the 'state' message from the server, draw the objects.

For each player of the "players" variable sent, draw "nickname" and "health" using context.fillText() function. It also draw the player's image("playerImage") using context.drawImage(), with context.translate()/context.rotate() to rotate the player to the direction specified by "angle".

If the player's "socketId" and the socket's is the same, the player is the current player. So, add the text 'You' to the player image, and show the point of the player.

For each bullet of the "bullets" variable sent, draw a circle using "context.arc()".

For each wall of the "walls" variable sent, draw a rectangle of the wall size.

socket.on('dead', () => {
    $("#start-screen").show();
});

When the 'dead' message representing the player's death, it shows the start screen.

2D game(client, mobile)

Now the game support keyboard input, but it cannot be played from smartphones(mobile devices). So, let's handle the touch events to make it possible to play the game on the smartphones. To make it simple, "tap" shoot a bullet, "tapping" moves the player, and sliding will change the direction of the player to left or right.

Add the code below to the browser(client) JavaScript code "static/game.js".

static/game.js

...
const touches = {};
$('#canvas-2d').on('touchstart', (event)=>{
    // console.log('touchstart', event, event.touches); 
    socket.emit('shoot');
    movement.forward = true;
    Array.from(event.changedTouches).forEach((touch) => {
        touches[touch.identifier] = {pageX: touch.pageX, pageY: touch.pageY};
    });
    event.preventDefault();
    console.log('touches', touches, event.touches);
});
$('#canvas-2d').on('touchmove', (event)=>{
    movement.right = false;
    movement.left = false;
    Array.from(event.touches).forEach((touch) => {
        const startTouch = touches[touch.identifier];
        movement.right |= touch.pageX - startTouch.pageX > 30;
        movement.left |= touch.pageX - startTouch.pageX < -30;
    });
    socket.emit('movement', movement);
    event.preventDefault();
});
$('#canvas-2d').on('touchend', (event)=>{
    Array.from(event.changedTouches).forEach((touch) => {
        delete touches[touch.identifier];
    });
    if(Object.keys(touches).length === 0){
        movement = {};
        socket.emit('movement', movement);
    }
    event.preventDefault();
});

Let's see the code.

On the "touchstart" event handler, it sends the 'shoot' message to the server to shoot a bullet, and set "move.forward" to true to move forward. It stores the position of the touch starts to "touches" variable.

On the "touchmove" event handler that is called when the touch position is changed, it changes the player direction left or right when the position is changed over 30.

On the "touchend" event handler that is called when the touched finger is left from the screen, it removes the touch from "touches" variable. If all the touch event ends, the movement is cleared.

Run 2D game

Let's run the 2D game program.

To make sure, type Ctrl-C to exit current server.

Type "nodemon server.js" to start the server!

$ nodemon server.js

You'll get a new button with text "3000" on the left side of the page. Click the button, and you'll get Browser application(a Browser application in the PaizaCloud).

f:id:paiza:20180620183217p:plain

Now, you'll see your player and bot player! You can move the player using arrow keys, and shoot bullets using space key. If your health reaches zero, the game is over.

As it is a multiplayer game, you can play with your friends. On the smartphone, you can play using finger touches.

3D game (HTML)

2D game is already enjoyable enough. But, the 3D game is more powerful, let's change the 2D game to the 3d game. Here, we use Three.js library to do 3D rendering with WebGL.

Download the "three.js" library below to the desktop of your PC.

http://threejs.org/build/three.js

Drag and Drop from the desktop to "static" directory on the file management view of the PaiaCloud to upload the file.

Next, edit the HTML file "static/index.html"

Load the "three.js" file by adding a SCRIPT tag to the HEAD element like below.

    <script src="/static/three.js"></script>

Add a canvas with ID "canvas-3d" for 3D rendering below the existing canvas with ID "canvas-2d". Set "z-index" to put the 2D canvas in front of the 3D canvas.

        <canvas id="canvas-2d" width="1000" height="1000" style="position: absolute; width: 100%; height: 100%; z-index:2;object-fit: contain;"></canvas>
        <canvas id="canvas-3d" width="1000" height="1000" style="position: absolute; width: 100%; height: 100%; z-index:1;object-fit: contain;"></canvas>

After the editing, HTML file will be like below.

static/index.html:

<html>
  <head>
    <title>A Multiplayer Game</title>
    <meta name="viewport" content="width=device-width,initial-scale=1.0,minimum-scale=1.0,maximum-scale=1.0,user-scalable=no">
    <script src="/socket.io/socket.io.js"></script>
    <script src="https://ajax.googleapis.com/ajax/libs/jquery/3.3.1/jquery.min.js"></script>
    <script src="/static/three.js"></script>
  </head>
  <body style="display: flex; flex-direction: column; width: 100%; height: 100%; margin: 0;">
    <div>Paiza Battle Ground</div>
    <div style="flex: 1 1; position: relative; overflow:hidden;">
        <div id="start-screen" style="width:100%; height:100%; display: flex; align-items: center; position:absolute; z-index:10;">
            <div style="text-align: center; width: 100%; font-size: xx-large;">
                <input type="text" name="nickname" id="nickname" placeholder="Your nickname" autofocus><br/><br/>
                <button style="font-size: xx-large;" id="start-button">Start</button>
            </div>
        </div>
        <canvas id="canvas-2d" width="1000" height="1000" style="position: absolute; width: 100%; height: 100%; z-index:2;object-fit: contain;"></canvas>
        <canvas id="canvas-3d" width="1000" height="1000" style="position: absolute; width: 100%; height: 100%; z-index:1;object-fit: contain;"></canvas>
    </div>
    <img id="player-image" src="/static/player.gif" style="display: none;">
  </body>
  <script src="/static/game-3d.js"></script>
</html>

3D game (Client)

Next, let's change browser(client) JavaScript code.

As rendering text in WebGL requires font files, download the font file below to desktop, and Drag and Drop the file to "static" directory on file management view on PaizaCloud for uploading the file.

https://raw.githubusercontent.com/mrdoob/three.js/master/examples/fonts/helvetiker_bold.typeface.json

Open the file "static/game.html" and edit like below.

static/game.js:

const socket = io();
const canvas2d = $('#canvas-2d')[0];
const context = canvas2d.getContext('2d');
const canvas3d = $('#canvas-3d')[0];
const playerImage = $("#player-image")[0];

const renderer = new THREE.WebGLRenderer({canvas: canvas3d});
renderer.setClearColor('skyblue');
renderer.shadowMap.enabled = true;

const scene = new THREE.Scene();
const camera = new THREE.PerspectiveCamera( 100, 1, 0.1, 2000 );

// Floor
const floorGeometry = new THREE.PlaneGeometry(1000, 1000, 1, 1);
const floorMaterial = new THREE.MeshLambertMaterial({color : 'lawngreen'});
const floorMesh = new THREE.Mesh(floorGeometry, floorMaterial);
floorMesh.position.set(500, 0, 500);
floorMesh.receiveShadow = true;
floorMesh.rotation.x = - Math.PI / 2; 
scene.add(floorMesh);

camera.position.set(1000, 300, 1000);
camera.lookAt(floorMesh.position);

// Materials
const bulletMaterial = new THREE.MeshLambertMaterial( { color: 0x808080 } );
const wallMaterial = new THREE.MeshLambertMaterial( { color: 'firebrick' } );
const playerTexture = new THREE.Texture(playerImage);
playerTexture.needsUpdate = true;
const playerMaterial = new THREE.MeshLambertMaterial({map: playerTexture});
const textMaterial = new THREE.MeshBasicMaterial({ color: 0xf39800, side: THREE.DoubleSide });
const nicknameMaterial = new THREE.MeshBasicMaterial({ color: 'black', side: THREE.DoubleSide });

// Light
const light = new THREE.DirectionalLight(0xffffff, 1);
light.position.set(-100, 300, -100);
light.castShadow = true;
light.shadow.camera.left = -2000;
light.shadow.camera.right = 2000;
light.shadow.camera.top = 2000;
light.shadow.camera.bottom = -2000;
light.shadow.camera.far = 2000;
light.shadow.mapSize.width = 2048;
light.shadow.mapSize.height = 2048;
scene.add(light);
const ambient = new THREE.AmbientLight(0x808080);
scene.add(ambient);

const loader = new THREE.FontLoader();
let font;
loader.load('/static/helvetiker_bold.typeface.json', function(font_) {
    font = font_;
});
        

// Helpers
// scene.add(new THREE.CameraHelper(light.shadow.camera));
// scene.add(new THREE.GridHelper(200, 50));
// scene.add(new THREE.AxisHelper(2000));
// scene.add(new THREE.DirectionalLightHelper(light, 20));

function animate() {
  requestAnimationFrame( animate );
  renderer.render( scene, camera );
}
animate();

function gameStart(){
    const nickname = $("#nickname").val();
    socket.emit('game-start', {nickname: nickname});
    $("#start-screen").hide();
}
$("#start-button").on('click', gameStart);

let movement = {};
$(document).on('keydown keyup', (event) => {
    const KeyToCommand = {
        'ArrowUp': 'forward',
        'ArrowDown': 'back',
        'ArrowLeft': 'left',
        'ArrowRight': 'right',
    };
    const command = KeyToCommand[event.key];
    if(command){
        if(event.type === 'keydown'){
            movement[command] = true;
        }else{ /* keyup */
            movement[command] = false;
        }
        socket.emit('movement', movement);
    }
    if(event.key === ' ' && event.type === 'keydown'){
        socket.emit('shoot');
    }
});

const touches = {};
$('#canvas-2d').on('touchstart', (event)=>{
    socket.emit('shoot');
    movement.forward = true;
    socket.emit('movement', movement);
    Array.from(event.changedTouches).forEach((touch) => {
        touches[touch.identifier] = {pageX: touch.pageX, pageY: touch.pageY};
    });
    event.preventDefault();
});
$('#canvas-2d').on('touchmove', (event)=>{
    movement.right = false;
    movement.left = false;
    Array.from(event.touches).forEach((touch) => {
        const startTouch = touches[touch.identifier];
        movement.right |= touch.pageX - startTouch.pageX > 30;
        movement.left |= touch.pageX - startTouch.pageX < -30;
    });
    socket.emit('movement', movement);
    event.preventDefault();
});
$('#canvas-2d').on('touchend', (event)=>{
    Array.from(event.changedTouches).forEach((touch) => {
        delete touches[touch.identifier];
    });
    if(Object.keys(touches).length === 0){
        movement = {};
        socket.emit('movement', movement);
    }
    event.preventDefault();
});

const Meshes = [];
socket.on('state', (players, bullets, walls) => {
    Object.values(Meshes).forEach((mesh) => {mesh.used = false;});
    
    // Players
    Object.values(players).forEach((player) => {
        let playerMesh = Meshes[player.id];
        if(!playerMesh){
            console.log('create player mesh');
            playerMesh = new THREE.Group();
        playerMesh.castShadow = true;
        Meshes[player.id] = playerMesh;
        scene.add(playerMesh);
        }
        playerMesh.used = true;
        playerMesh.position.set(player.x + player.width/2, player.width/2, player.y + player.height/2);
    playerMesh.rotation.y = - player.angle;
        
        if(!playerMesh.getObjectByName('body')){
            console.log('create body mesh');
        mesh = new THREE.Mesh(new THREE.BoxGeometry(player.width, player.width, player.height), playerMaterial);
        mesh.castShadow = true;
        mesh.name = 'body';
        playerMesh.add(mesh);
        }

        if(font){
            if(!playerMesh.getObjectByName('nickname')){
                console.log('create nickname mesh');
                mesh = new THREE.Mesh(
                    new THREE.TextGeometry(player.nickname,
                        {font: font, size: 10, height: 1}),
                        nicknameMaterial,
                );
                mesh.name = 'nickname';
                playerMesh.add(mesh);

                mesh.position.set(0, 70, 0);
                mesh.rotation.y = Math.PI/2;
            }
            {
                let mesh = playerMesh.getObjectByName('health');

                if(mesh && mesh.health !== player.health){
                    playerMesh.remove(mesh);
                    mesh.geometry.dispose();
                    mesh = null;
                }
                if(!mesh){
                    console.log('create health mesh');
                    mesh = new THREE.Mesh(
                        new THREE.TextGeometry('*'.repeat(player.health),
                            {font: font, size: 10, height: 1}),
                            textMaterial,
                    );
                    mesh.name = 'health';
                    mesh.health = player.health;
                    playerMesh.add(mesh);
                }
                mesh.position.set(0, 50, 0);
                mesh.rotation.y = Math.PI/2;
            }
        }
        
        
        if(player.socketId === socket.id){
            // Your player
      camera.position.set(
          player.x + player.width/2 - 150 * Math.cos(player.angle),
          200,
                player.y + player.height/2 - 150 * Math.sin(player.angle)
            );
      camera.rotation.set(0, - player.angle - Math.PI/2, 0);
      
      // Write to 2D canvas
            context.clearRect(0, 0, canvas2d.width, canvas2d.height);
            context.font = '30px Bold Arial';
            context.fillText(player.point + ' point', 20, 40);
        }
    });
    
    // Bullets
    Object.values(bullets).forEach((bullet) => {
        let mesh = Meshes[bullet.id];
        if(!mesh){
            mesh = new THREE.Mesh(new THREE.BoxGeometry(bullet.width, bullet.width, bullet.height), bulletMaterial);
        mesh.castShadow = true;
        Meshes[bullet.id] = mesh;
        // Meshes.push(mesh);
        scene.add(mesh);
        }
        mesh.used = true;
        mesh.position.set(bullet.x + bullet.width/2, 80, bullet.y + bullet.height/2);
    });
    
    // Walls
    Object.values(walls).forEach((wall) => {
        let mesh = Meshes[wall.id];
        if(!mesh){
        mesh = new THREE.Mesh(new THREE.BoxGeometry(wall.width, 100, wall.height), wallMaterial);
        mesh.castShadow = true;
        Meshes.push(mesh);
        Meshes[wall.id] = mesh;
        scene.add(mesh);
        }
        mesh.used = true;
        mesh.position.set(wall.x + wall.width/2, 50, wall.y + wall.height/2);
    });
    
    // Clear unused Meshes
    Object.keys(Meshes).forEach((key) => {
        const mesh = Meshes[key];
        if(!mesh.used){
            console.log('removing mesh', key);
            scene.remove(mesh);
            mesh.traverse((mesh2) => {
                if(mesh2.geometry){
                    mesh2.geometry.dispose();
                }
            });
            delete Meshes[key];
        }
    });
});

socket.on('dead', () => {
    $("#start-screen").show();
});

Let's see the code focusing on the difference from the "2D game" code.

const renderer = new THREE.WebGLRenderer({canvas: canvas3d});
renderer.setClearColor('skyblue');
renderer.shadowMap.enabled = true;

At first, create a THREE.WebGLRender object for 3D rendering in WebGL using Three.js, and set color and enable shadowing.

const scene = new THREE.Scene();

The "scene" global variable is to manage all the 3D objects on Three.js.

const camera = new THREE.PerspectiveCamera( 100, 1, 0.1, 2000 );

Create a camera object from THREE.PerspectiveCamera class, representing the viewpoint for the 3D rendering,

// Floor
const floorGeometry = new THREE.PlaneGeometry(1000, 1000, 1, 1);
const floorMaterial = new THREE.MeshLambertMaterial({color : 'lawngreen'});
const floorMesh = new THREE.Mesh(floorGeometry, floorMaterial);
floorMesh.position.set(500, 0, 500);
floorMesh.receiveShadow = true;
floorMesh.rotation.x = - Math.PI / 2; 
scene.add(floorMesh);

Create a floor objects using THREE.Mesh class from THREE.PlaneGeometry object representing plane figure, and THREE.MeshLambertMaterial object representing a color.

Set the position using "position" property, and rotate by setting "rotation" property. Here, as we create a plane on X-Y plane (0,0)-(1000,1000), set the position representing the center of the object to (500,500). As the plane is vertical, rotate -PI/2 to make the plane horizontal.

Add the created 3D object wit sence.add().

camera.position.set(1000, 300, 1000);
camera.lookAt(floorMesh.position);

Set the camera position using "camera.position", and set the direction of the camera to the floor using "camera.lookAt()".

// Light
const light = new THREE.DirectionalLight(0xffffff, 1);
...
scene.add(light);
const ambient = new THREE.AmbientLight(0x808080);
scene.add(ambient);

Create a DirectionalLight with and an AmbilentLight.

const loader = new THREE.FontLoader();
let font;
loader.load('/static/helvetiker_bold.typeface.json', function(font_) {
    font = font_;
});

Load a font file needed to rendering text in WebGL using THREE.FontLoader().

function animate() {
  requestAnimationFrame( animate );
  renderer.render( scene, camera );
};
animate();

Call render.render() for 3D rendering. Use requestAnimationFrame() to render on the appropriate time for the animation.

Meshes = [];
socket.on('state', (players, bullets, walls) => {
});

socket.on('state') receives the state of players, bullets, walls from the server, and create, change, or delete 3D objects. The 3D objects using is stored in "Meshes" global variable.

            playerMesh = new THREE.Group();
...
            mesh = new THREE.Mesh(new THREE.BoxGeometry(player.width, player.width, player.height), playerMaterial);
            playerMesh.add(mesh);
...
                mesh = new THREE.Mesh(
                    new THREE.TextGeometry(player.nickname,
                        {font: font, size: 10, height: 1}),
                        nicknameMaterial,
                );
                playerMesh.add(mesh);
...
                    mesh = new THREE.Mesh(
                        new THREE.TextGeometry('*'.repeat(player.health),
                            {font: font, size: 10, height: 1}),
                            textMaterial,
                    );
                    playerMesh.add(mesh);

Create a Player 3D object. As the player object have body, nickname, and health to show, make a group for those using "THREE.GROUP()".

        if(player.socketId === socket.id){
            // Your player
            camera.position.set(
                player.x + player.width/2 - 150 * Math.cos(player.angle),
                200,
                      player.y + player.height/2 - 150 * Math.sin(player.angle)
                  );
            camera.rotation.set(0, - player.angle - Math.PI/2, 0);
      
      // Write to 2D canvas
            context.clearRect(0, 0, canvas2d.width, canvas2d.height);
            context.font = '30px Bold Arial';
            context.fillText(player.point + ' point', 20, 40);
        }

Set the camera position and direction based on your player, to make the game like TPS(Third person shooter). Draw the player's point on the 2D canvas.

            mesh = new THREE.Mesh(new THREE.BoxGeometry(bullet.width, bullet.width, bullet.height), bulletMaterial);
            scene.add(mesh);

Create a bullet 3D object, and add it to the scene.

          mesh = new THREE.Mesh(new THREE.BoxGeometry(wall.width, 100, wall.height), wallMaterial);
          scene.add(mesh);

Create a wall object, and add it to the scene.

Also, store those object to "Meshes" array so that we can reuse the object for next rendering.

Run 3D game

Let's run the 3D game program.

To make sure, type Ctrl-C to exit current server.

Type "nodemon server.js" to start the server!

$ nodemon server.js

You'll get a new button with text "3000" on the left side of the page. Click the button, and you'll get Browser application(a Browser application in the PaizaCloud).

f:id:paiza:20180620183217p:plain

Now, you see the 3D game with 3D players! You can move the player using arrow keys, and shoot bullets using space key. If your player's health reaches zero, the game is over.

As it is a multiplayer game, you can play with your friends. On the smartphone, you can play using finger touches.

Note that on PaizaCloud free plan, the server will be suspended. To run the bot continuously, please upgrade to the BASIC plan.

Source code

The source code for the game is available below:

GitHub - yoshiokatsuneo/paiza-battle-ground

Demo

You can play the game on the following URL.

2D game: https://paiza-battle-ground.paiza-user.cloud/static/2d.html 3D game: https://paiza-battle-ground.paiza-user.cloud/

Summary

With PaizaCloud Cloud IDE, we created a 3D online multiplayer game just in your browser, without installing or setting up any development environments. We run the server in PaizaCloud so that we can play the game with friends, or anyone in the world! Now, let's create your own games!


With「PaizaCloud Cloud IDE」, you can flexibly and easily develop your web application or server application, and publish it, just in your browser. https://paiza.cloud


Big 3 web application frameworks: Ruby on Rails, Django and Laravel

f:id:paiza:20180502181055p:plain
(Japanese article is here)

f:id:paiza:20151217152725j:plainHello, I'm Tsuneo!(@)

What web application frameworks do you choose?

Now, there are 3 major web application frameworks: Ruby on Rails, Django, Laravel.

All of those are full-stack frameworks having all the major features to build web applications. But, each has their own feature, structure, philosophy, or programming language.

You may hear the name of those frameworks, but not so many developers actually have used all those frameworks.

Even if you are comfortable with your favorite framework, other frameworks will show you the web application development from different angles.

At the same time, you may not understand the features and feel the atmosphere just by browsing the list of features. So, I'll show the features and differences of those web application frameworks by actually creating ToDo list applications with Ruby on Rails, Django, and Laravel.

Here, we'll create the web application using cloud IDE PaizaCloud so that we don't need to install and set up the development environment for all the frameworks. So, let's build the application together!

Trend of Web application frameworks

At first, let's see the trends of Ruby on Rails, Django, and Laravel on Google trends and Stackoverflow Trends.

f:id:paiza:20180507160320p:plain

(Google Trends より)

f:id:paiza:20180507161233p:plain ( Stack Overflow Trends より )

All of Ruby on Rails, Django, and Laravel have quite similar popularity, at now.

I can say that Ruby on Rails go over the fever, Django is stable, and Laravel is growing.

Comparison

Next, let's see the strength of each framework on the comparison sheet.

Ruby on Rails and Django was released on the similar date, but Laravel is newer.

Ruby on Rails and Laravel have many features like code generation, and allow you to build the applications by writing only a little codes. But, Django have less "magic" and ask you to write code explicitly so that you code can be more readable.

Ruby on Rails
f:id:paiza:20180502181239p:plain:w100
Django
f:id:paiza:20180502181248p:plain:w100
Laravel
f:id:paiza:20180502181255p:plain:w100
Language Ruby Python PHP
Release 13 Dec 2005 21 July 2005 June 2011
Latest version
(in 2018/5)
5.2 2.0 5.6
Popularity ★★★ ★★ ★★
Features ★★★ ★★ ★★★
Code generations ★★★ ★★
Readable ★★ ★★★ ★★
AI, Machine Learning ★★ ★★★
Use cases Airbnb, GitHub, etc. Instagram, etc. STARTUPS.CO, LaravelIO, etc.
Philosophy - Convention over Configuration(CoC)
- Don't Repeat Yourself(DRY)
- Explicit is better than implicit
- loose coupling and tight cohesion
- Happy developers make the best code.
- expressive, elegant syntax

Getting started with PaizaCloud Cloud IDE

As it is a bit of cumbersome to set up development environments for Ruby on Rails, Django, and Laravel, we'll use PaizaCloud, a cloud-based web development environment. PaizaCloud is a browser-based web development environment supporting Ruby on Rails, Django, Laravel. So, you don't need to locally install and set up your development environment.

So, let's start.

Here is the website of PaizaCloud Cloud IDE.

https://paiza.cloud/

Just sign up with email and click a link in the confirmation email. You can also sign up with GitHub or Google.

Then, let's create a new server for the development workspace.

f:id:paiza:20171214154558p:plain

Click "new server" to open a dialog to set up the server.

Here, you can choose "phpMyAdmin", and "MySQL", and click "New Server" button.

f:id:paiza:20180306171813p:plain

Just in 3 seconds, you'll get a browser-based development environment for Ruby on Rails, Django, or Laravel.

You'll see editor or browser windows in the page, but we can close those for now.

Now, let's see those frameworks!

Ruby on Rails - Convention over Configuration. Don't Repeat Yourself.

f:id:paiza:20180502181239p:plain

Language: Ruby
Release: 13 Dec 2005
Latest version: 5.2
Popularity: ★★★
Features: ★★★
Code generation: ★★★
Readability: ★★
AI, machine learning: ★★
Use cases: AirBnb, GitHub, etc.
Philosophy: Convention over Configuration(CoC), Don't Repeat Yourself(DRY)

If there is a King of the web application framework, it is Ruby on Rails.

Before the Ruby on Rails comes, only available options are PHP for basic web applications, or Java-based frameworks for Enterprise web applications with complex many configuration files.

Individual developer and small startup cannot create large scale web applications in a timely manner.

Then, Ruby on Rails comes with the message "Creating blog engine in 15 minutes"!

Ruby on Rails is an opinionated framework with philosophies: Don't Repeat Yourself(DRY), Convention over Configuration(CoC). Just by following the "rails", you can build the well-structured large scale web application naturally.

Ruby on Rails has many smart features for web developments. MVC, scaffolding, generator, migration, routing, model, controller, ORM(Active Record) changes the way to develop web applications. "Ruby" as an object-oriented scripting language and "Ruby on Rails" is the best partner for web developments that require speedy and flexible development.

The development of Ruby on Rails is quite active. Recent release added webpack for front-end development.

Now, let's create a Ruby on Rails application!

Click the Terminal icon on the left-side of PaizaCloud.

f:id:paiza:20171214154805p:plain

Create the "myapp" project with database "MySQL".

$ rails new myapp --database=mysql

Then, run "rails generate scaffold" command to create database migration, controller, view, model, routing.

$ cd myapp
$ rails generate scaffold todo body:text

Run "rake db:migrate" to execute the migration file to create the database table.

$ rake db:migrate

Run "rails server" command to start the Rails server on the default port 3000.

$ rails server

Click the browser icon with "3000" on the left-side of PaizaCloud to open the browser on PaizaCloud.

Type "http://localhost/todos/" and you'll see the ToDo list application!

f:id:paiza:20180508160949p:plain

Let's see the file structure on the file manager view. The "app" directory have controller, model, view subdirectories.

f:id:paiza:20180502172755p:plain

Let's see the model file. There is almost no code on the file. Ruby on Rails have ActiveRecord that allows you to access database table as Ruby class, so you don't need to write code to access the database.

myapp/app/models/todo.rb:

class Todo < ApplicationRecord
end

Let's see the controller. It has CRUD actions(creating, reading, updating and deleting). As the instance variable "@NAME" can be referred from view, you can set those variables to show in the browser.

myapp/app/controllers/todos_controller.rb:

class TodosController < ApplicationController
  before_action :set_todo, only: [:show, :edit, :update, :destroy]

  # GET /todos
  # GET /todos.json
  def index
    @todos = Todo.all
  end

  # GET /todos/1
  # GET /todos/1.json
  def show
  end

  # GET /todos/new
  def new
    @todo = Todo.new
  end

  # GET /todos/1/edit
  def edit
  end

  # POST /todos
  # POST /todos.json
  def create
    @todo = Todo.new(todo_params)

    respond_to do |format|
      if @todo.save
        format.html { redirect_to @todo, notice: 'Todo was successfully created.' }
        format.json { render :show, status: :created, location: @todo }
      else
        format.html { render :new }
        format.json { render json: @todo.errors, status: :unprocessable_entity }
      end
    end
  end

  # PATCH/PUT /todos/1
  # PATCH/PUT /todos/1.json
  def update
    respond_to do |format|
      if @todo.update(todo_params)
        format.html { redirect_to @todo, notice: 'Todo was successfully updated.' }
        format.json { render :show, status: :ok, location: @todo }
      else
        format.html { render :edit }
        format.json { render json: @todo.errors, status: :unprocessable_entity }
      end
    end
  end

  # DELETE /todos/1
  # DELETE /todos/1.json
  def destroy
    @todo.destroy
    respond_to do |format|
      format.html { redirect_to todos_url, notice: 'Todo was successfully destroyed.' }
      format.json { head :no_content }
    end
  end

  private
    # Use callbacks to share common setup or constraints between actions.
    def set_todo
      @todo = Todo.find(params[:id])
    end

    # Never trust parameters from the scary internet, only allow the white list through.
    def todo_params
      params.require(:todo).permit(:body)
    end
end

Let's see the view file. It is an HTML file with ERB with "<% %>"、"<%= %>" blocks. "<% %>" syntax allows you to run the ruby code inside, and "<%= %>" allows you to embed the result of the ruby code to show in the browser.

myapp/app/views/todos/index.html.erb

<p id="notice"><%= notice %></p>

<h1>Todos</h1>

<table>
  <thead>
    <tr>
      <th>Body</th>
      <th colspan="3"></th>
    </tr>
  </thead>

  <tbody>
    <% @todos.each do |todo| %>
      <tr>
        <td><%= todo.body %></td>
        <td><%= link_to 'Show', todo %></td>
        <td><%= link_to 'Edit', edit_todo_path(todo) %></td>
        <td><%= link_to 'Destroy', todo, method: :delete, data: { confirm: 'Are you sure?' } %></td>
      </tr>
    <% end %>
  </tbody>
</table>

<br>

<%= link_to 'New Todo', new_todo_path %>

The details of Ruby on Rails development tutorial is available here:

engineering.paiza.io

Django - Explicit is better than implicit.

f:id:paiza:20180502181248p:plain

Language: Python
Release: 21 July 2005
Latest version: 2.0
Popularity: ★★
Features: ★★
Code generation: ★
Readability: ★★★
AI, machine learning: ★★★
Use cases: Instagram, etc.
Philosophy: Loose coupling and tight cohesion, Expicit is better than implicit.

Django is the most popular web application framework in Python. Python is getting more popular for AI and machine learning.

As Django does not magically generate so many codes like Ruby on Rails, you need to explicitly write more code by yourself. But, it means, you can write lean and readable code.

Django is a full-stack framework with many features for web development. You can also utilize a bunch of Python libraries including libraries for machine learning.

Django also has a feature for admin pages, so you can easily create admin pages for browsing or editing database tables.

Django development is active, and the latest Django2.0 was just released in December 2017. In Python, it is often a controversial topic to choose whether Python2 or Python3. But, as Django2.0 only support Python3, you don't need to care about it and just use Python3 with Django2.0.

So, let's start building a web application in Django.

At first, click Terminal button on the left-side of PaizaCloud.

f:id:paiza:20171214154805p:plain

$ django-admin startproject mysite
$ python3 manage.py startapp todo

In Django, you can have multiple application in one project. Here, let's create a project "mysite", and an application "todo" inside the project.

Then, edit the created files.

On the site level routing, set path for the ToDo application.

mysite/urls.py:

from django.urls import include, path
from django.contrib import admin
from django.views.generic import RedirectView

urlpatterns = [
    path('todo/', include('todo.urls')),
    path('admin/', admin.site.urls),
    path('',  RedirectView.as_view(url='/todo/')),
]

On the application level routing, set action for "/todo" to "views.index" function.

mysite/todo/urls.py:

from django.urls import path
from . import views

urlpatterns = [
    path('', views.index, name='index'),
]

On the database setting, change and set to use MySQL. (You can also use SQLite that is default setting). Don't forget to add "pymysql.install_as_MySQLdb()" to use MySQL.

mysite/mysite/settings.py:

# Database
# https://docs.djangoproject.com/en/2.0/ref/settings/#databases
import pymysql
pymysql.install_as_MySQLdb()

DATABASES = {
#    'default': {
#        'ENGINE': 'django.db.backends.sqlite3',
#        'NAME': os.path.join(BASE_DIR, 'db.sqlite3'),
#    }
    'default': {
        'ENGINE': 'django.db.backends.mysql',
        'NAME': 'mydb',
        'USER': 'root',
        'PASSWORD': '',
        'HOST': '127.0.0.1',
        'PORT': '3306',
    }
}

Then, on the site level settings, add 'todo.apps.ToDoConfig' to INSTALLED_APPS to use our ToDo app.

mysite/mysite/settings.py:

INSTALLED_APPS = [
    'todo.apps.TodoConfig',
    'django.contrib.admin',
    'django.contrib.auth',
    'django.contrib.contenttypes',
    'django.contrib.sessions',
    'django.contrib.messages',
    'django.contrib.staticfiles',
]

Create a model. On the model class, define variable associated to the column on the database.

mysite/todo/models.py:

from django.db import models


class Post(models.Model):
    body = models.CharField(max_length=200)

Django can create the migration file from the model.

$ python3 manage.py makemigrations todo

Run the migration file.

$ python3 manage.py migrate

Create a view code. (This is called "controller" in Ruby on Rails.) In Django, variables used in HTML templates are explicitly passed as the render() functions argument.

mysite/todo/views.py:

from django.shortcuts import render, get_object_or_404
from django.http import HttpResponseRedirect, HttpResponse
from django.urls import reverse
from .models import Post
from .forms import PostForm

# Create your views here.
def index(request):
    posts = Post.objects.all()
    form = PostForm()
    context = {'posts': posts, 'form': form, }
    return render(request, 'todo/index.html', context)
    
def create(request):
    form = PostForm(request.POST)
    form.save(commit=True)
    return HttpResponseRedirect(reverse('todo:index'))

def delete(request, id=None):
    post = get_object_or_404(Post, pk=id)
    post.delete()
    return HttpResponseRedirect(reverse('todo:index'))

Create a template file. Here, we'll use Milligram CSS framework.

On the template file, as we cannot use the Python's indent style, we use the specific syntax for the Django template.

On the Django template, we can use "{% %}" for writing the Python code, and "{{ }}" for showing the result of the code.

Write the layout file.(base.html)

mysite/todo/templates/todo/base.html:

{% load staticfiles %}
<!DOCTYPE html>
<html>
    <head>
        <title>Todo List</title>
        <!-- CSS And JavaScript -->
        <link rel="stylesheet" href="//fonts.googleapis.com/css?family=Roboto:300,300italic,700,700italic">
        <link rel="stylesheet" href="//cdn.rawgit.com/necolas/normalize.css/master/normalize.css">
        <link rel="stylesheet" href="//cdn.rawgit.com/milligram/milligram/master/dist/milligram.min.css">
        <link rel="stylesheet" href="{% static 'css/todo.css' %}">
    </head>
    <body>
        <div class="container">
            {% block content %}
            {% endblock %}
        </div>
    </body>
</html>

Then, write the HTML template file to show.(index.html).

mysite/todo/templates/todo/index.html:

{% extends 'todo/base.html' %}

{% block content %}
    <h1>Todo List</h1>

    {% if error_message %}<p><strong>{{ error_message }}</strong></p>{% endif %}
    <form action="{% url 'todo:create' %}" method="post">
        {% csrf_token %}
        <!-- Todo Name -->
        <div class="form-group">
            <label for="todo" class="col-sm-3 control-label">Todo</label>
            <div class="col-sm-6">
                {{ form.body }}
            </div>
        </div>

        <!-- Add Todo Button -->
        <div class="form-group">
            <div class="col-sm-offset-3 col-sm-6">
                <button type="submit" class="btn btn-default">
                    <i class="fa fa-plus"></i> Add Todo
                </button>
            </div>
        </div>

    </form>
    

    <!-- Current Todos -->
    <h2>Current Todos</h2>
    <table class="table table-striped todo-table">
        <thead>
            <th>Todos</th><th>&nbsp;</th>
        </thead>

        <tbody>
            {% for post in posts %}
                <tr>
                    <!-- Todo Name -->
                    <td>
                        <div>{{ post.body }}</div>
                    </td>
                    <td>
                        <form action="{% url 'todo:delete' post.id %}" method="post">
                            {% csrf_token %}
                            <button>Delete</button>
                        </form>
                    </td>
                </tr>
            {% endfor %}
        </tbody>
    </table>
    
{% endblock %}

In Django, HTML form can be defined as form class as python code, and the HTML form can be generated from the class. Let's define the Post form class.

mysite/todo/forms.py:

from django import forms

from .models import Post

class PostForm(forms.ModelForm):
    class Meta:
        model = Post
        fields = ('body',)

That's it !

Start the server on port 8000.

$ python3 manage.py runserver

Browser icon with text "8000" will appear on the left-side of PaizaCloud. Click it to open the page in the browser on PaizaCloud.

f:id:paiza:20180216181609p:plain

The details of Django development tutorial is available here:

engineering.paiza.io

Laravel - Happy developers make the best code.

f:id:paiza:20180502181255p:plain

Language: PHP
Release: June 2011
Latest version: 5.6
Popularity: ★★
Features: ★★★
Code generation: ★★
Readability: ★★
AI, machine learning: ★
Use cases: STARTUPS.CO, LaravelIO, etc.
Philosophy: Expressive, elegant syntax., Happy developers make the best code.

PHP did not have the definitive web application framework like Ruby on Rails in Ruby. There were many frameworks like CakePHP, Zend Framework, Code Igniter, Symfony...

And, Laravel appeared as a modern framework by importing good parts of other frameworks like Ruby on Rails.

Laravel has grown rapidly with active communities, and become the most popular framework in PHP. Google Trends shows the growth of Laravel's popularity.

f:id:paiza:20180216013143p:plain (Google Trends より)

PHP itself was created as an HTML template engine, and one of the oldest web development language. While you can easily start writing web applications, it is often difficult to create large web applications.

But, Laravel utilized modern features like object-oriented syntax, the package manager(composer), MVC, generator, model, migration, ORM(Eloquent), the template engine(Blade) or DI, and make it possible to build readable large-scale applications in PHP.

PHP is widely used on many web sites or tools like WordPress, Laravel have the advantage to use PHP based resource and knowledge.

Now, let's create a web application in Laravel.

Click Terminal icon on the left-side of PaizaCloud.

f:id:paiza:20171214154805p:plain

Create a project with name "myapp".

$ laravel new myapp
$ cd myapp
$ php artisan serve

Create a database "mydb".

$ mysql -u root
create database mydb;

Edit the database configuration file. Right-click on file manager to open context menu, choose "Show Hidden files" to show files begun with a dot('.').

myapp/.env:

DB_DATABASE=mydb
DB_USERNAME=root
# DB_PASSWORD=secret

Create model, controller, and migration file with one command.

$ php artisan make:model Task -m -c -r

In the migration file, add "$table->string('name');" to add "name" column to the database table.

database/migrations/2018_xx_xx_xxxxxxxx_create_tasks_table:

    public function up()
    {
        Schema::create('tasks', function (Blueprint $table) {
            $table->increments('id');
            $table->string('name');
            $table->timestamps();
        });
    }

Run the migration.

$ php artisan migrate

Edit routing file by setting actions for "GET /tasks", "POST /tasks", "DELETE /tasks/{id}" to call TaskController functions.

routes/web.php:

Route::get('/', function(){return redirect('/tasks');});
Route::get('/tasks', 'TaskController@index');
Route::post('/tasks', 'TaskController@store');
Route::delete('/tasks/{id}', 'TaskController@destroy');
\URL::forceScheme('https');

In the controller, write actions showing web pages. Thanks to Eloquent model, we can refer the database columns as object's instance variables like "$task->name".

app/Http/Controllers/TaskController.php:

<?php

namespace App\Http\Controllers;

use App\Task;
use Illuminate\Http\Request;

class TaskController extends Controller
{
    public function index()
    {
        $tasks = Task::all();
        return view('tasks', ['tasks' => $tasks]);
    }

    public function store(Request $request)
    {
        $task = new Task;
        
        $task->name = request('name');
        $task->save();
        return redirect('/tasks');
    }

    public function destroy(Request $request, $id, Task $task)
    {
        $task = Task::find($id);
        $task->delete();
        return redirect('/tasks'); 
    }
}

Create a view file.

Although PHP itself is a template engine, it sometimes lengthy and not so readable.

Laravel uses Blade template engine to run codes or show results in the HTML file concisely.

Let's see the model file.

app/Task.php:

<?php

namespace App;

use Illuminate\Database\Eloquent\Model;

class Task extends Model
{
    //
}

There is only an empty class extended from Model class.

By using Eloquent ORM engine, we can refer the database column as the property of the objects.

That's it!

Let's run the server.

$ cd ~/myapp
$ php artisan serve

The server runs on port 8000. Click browser icon with text "8000", and we see the web application!

f:id:paiza:20180216011331p:plain

The details of Laravel development tutorial is available here:

engineering.paiza.io

Summary

We compared the big 3 web application frameworks: Ruby on Rails, Django, Laravel, by building the real application with database. All of those are full-stack frameworks with many features.

With PaizaCloud, We could build the real application without installing and setting up the development environment. I believe that the best way to know about the frameworks is to create applications by our hands. Let's try by yourself!


With「PaizaCloud Cloud IDE」, you can flexibly and easily develop your web application or server application, and publish it, just in your browser. https://paiza.cloud
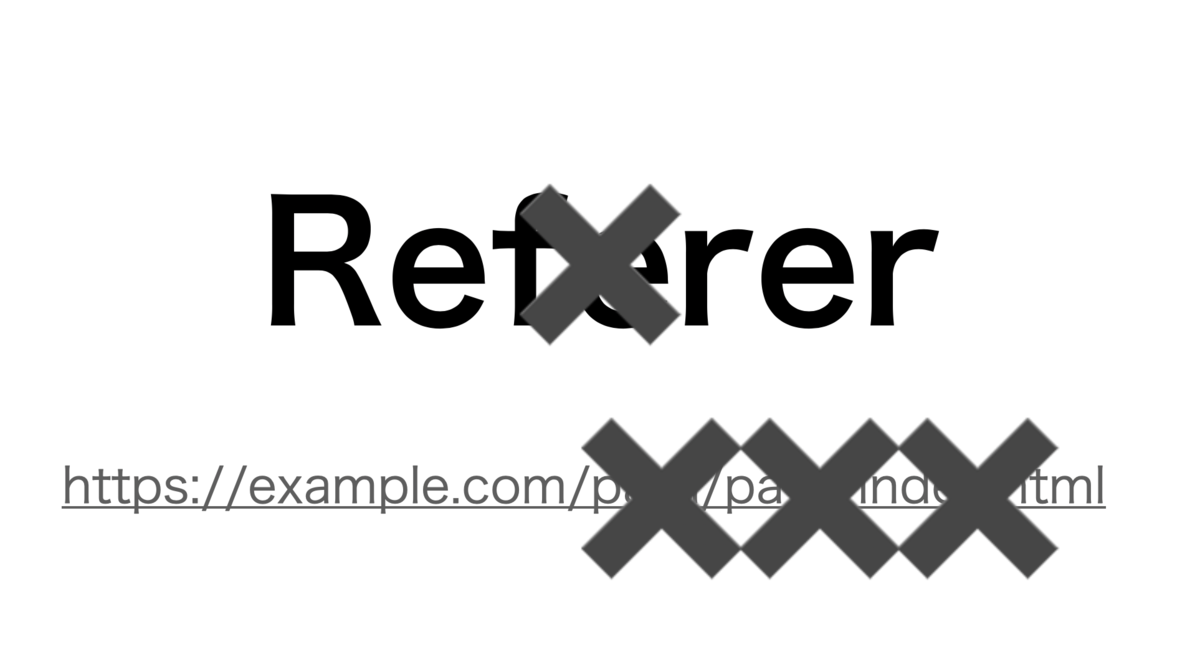

Web development on iPad using PaizaCloud Cloud IDE as iPad IDE

f:id:paiza:20180403161451p:plain
(Japanese article is here)

f:id:paiza:20151217152725j:plainHello, I'm Tsuneo!(@).

Do you have an iPad?

With iPad, we can edit e-mail, browse the web, create documents or spreadsheets or presentation, browser photos or movies quite handy. With millions of applications on App Store, iPad can even be more useful than PC.

Isn't it more useful if we can develop web or other applications on iPad?

So, here comes PaizaCloud Cloud IDE. PaizaCloud is a browser-based web development environment in the Cloud. With PaizaCloud, we can develop web applications or other applications on iPad!

PaizaCloud supports iPad, and have browser-based editor, terminal, browser-in-browser, file manager for building applications. PaizaCloud has development environments like Ruby on Rails, Django, Node.js, Laravel, PHP, Java(tomcat), MySQL, Jupyter Notebook... You don't need to struggle with annoying installing and setting up development environment.

As you can use the same environment from any devices, you can develop on PC today, and continue development on a cafe using iPad tomorrow.

In this article, we actually build a BBS application on iPad using PaizaCloud and Ruby on Rails. We can build the application just in 10 seconds just following the instruction.

Getting started with PaizaCloud Cloud IDE

So, here is the website of PaizaCloud Cloud IDE.

https://paiza.cloud/

Just sign up with email and tap a link in the confirmation email. You can also sign up with GitHub or Google.

Create new server

Let's create a new server for the development workspace.

f:id:paiza:20171214154558p:plain

Tap "new server" to open a dialog to set up the server.

Here, you can choose "Ruby on Rails", "phpMyAdmin", and "MySQL", and tap "New Server" button.

f:id:paiza:20171214154330p:plain

Just in 3 seconds, you'll get a browser-based development environment for Ruby on Rails.

Create an application

Then, let's create your Ruby on Rails application.

You can use "rails new" command to create Ruby on Rails application.

On PaizaCloud Cloud IDE, you can use PaizaCloud's "Terminal" application to run the commands in your browser.

Let's tap the "Terminal" button at the left side of the page.

f:id:paiza:20171214154805p:plain

Now, the "Terminal" application launch. So, let's type "rails new [application name]" command in the Terminal.

f:id:paiza:20171213234417p:plain

The '[application name]' is the name of the application you are creating. You can choose whatever you want, like "music-app" or "game-app". Here, I'll choose the application name "myapp", where I can manage the list of posts.

Also, let's add "--database=mysql" to use MySQL database.

So, lets type:

$ rails new myapp --database=mysql

f:id:paiza:20180403160018p:plain

In the file finder view at the left side of the page, you'll see the "myapp" directory. Tap the folder to open it to see inside the directory.

f:id:paiza:20180402171847p:plain

You'll see a bunch of files for the Ruby on Rails application.

You'll already have a MySQL server running because you checked it on the server setting. But if not, you can always manually start like:

$ sudo systemctl enable mysql
$ sudo systemctl start mysql

On PaizaCloud Cloud IDE, you can install packages on root privilege.

Start Ruby on Rails server

Now, you can already run the application. Let's start the application.

Change the directory by "cd myapp", and type "rails server" to start the server!

$ cd myapp
$ rails server

f:id:paiza:20171213234757p:plain

You'll get a new button with text "3000" on the left side of the page.

f:id:paiza:20171213234820p:plain

Ruby on Rails server runs on port 3000. PaizaCloud Cloud IDE detects the port number(3000), and automatically adds the button to open a browser for the port.

Tap the button, and you'll get Browser application(a Browser application in the PaizaCloud). Now, you'll see web page about Ruby on Rails, that is your application!

f:id:paiza:20171213234947p:plain

Create new database table

Next, let's use database on the application.

On Ruby on Rails, you can just use "rails generate scaffold" command to create all files or a database table, a model, a controller, or a routing.

Here, we create a table "posts" with fields "title", "body", and "published".

Now, open another terminal(or, type 'Ctrl-C' to exit "rails server") and type:

$ rails generate scaffold post title:string body:text published:boolean

f:id:paiza:20180402171820p:plain

After that, run commands for creating and migrating database table.

$ rake db:create
$ rake db:migrate

f:id:paiza:20180402171806p:plain

Done! Put "http://localhost:3000/posts/" in the URL bar of the PaizaCloud browser application.

Then, you'll get the list of the board game. Let's try to add or delete the posts.

f:id:paiza:20180403160110p:plain

You can see the database table using phpMyAdmin.

On PaizaCloud browser application, put "http://localhost/phpmyadmin/" in the URL bar.

f:id:paiza:20180403160134p:plain

Edit files

Now, let's change the title by editing the file.

To edit a file, double-tap the file on the file finder view.

Open "boardgame-app/app/views/games/index.html.erb" for editing.

f:id:paiza:20180402171658p:plain

Then, change the title inside <h1>.

myapp/app/views/posts/index.html.erb:

<h1>Welcome to My BBS!</h1>

f:id:paiza:20180403160213p:plain

Then, click "Save" button, or push "Command-S", or "Ctrl-S".

f:id:paiza:20171213235606p:plain

To see the list from top page, let's redirect from top page to the "/posts/" page.

Open "config/route.rb", and append routing for the root page like below.

config/route.rb:

  root to: redirect('/posts/')

f:id:paiza:20171214000215p:plain

Now, the basics of the application is done!

Adding CSS framework

To make the page beautiful, let's add a minimalist CSS framework Milligram.

app/views/layouts/aplication.html.erb

  <head>
    <link rel="stylesheet" href="//fonts.googleapis.com/css?family=Roboto:300,300italic,700,700italic">
    <link rel="stylesheet" href="//cdn.rawgit.com/necolas/normalize.css/master/normalize.css">
    <link rel="stylesheet" href="//cdn.rawgit.com/milligram/milligram/master/dist/milligram.min.css">

f:id:paiza:20171214001352p:plain

Now, it's done! Isn't it cool!?

f:id:paiza:20180403161451p:plain

Although we used PaizaCloud on floating window mode, you can switch to tab windows mode for full-screen editing by tapping window bar's maximize button, or by tapping blue button with PaizaCloud button to open a menu and choose "Tab Window Mode".

f:id:paiza:20180403160725p:plain

Summary

With PaizaCloud Cloud IDE, we created a Ruby on Rails application on iPad. Now, let's create your own Ruby on Rails application!


With「PaizaCloud Cloud IDE」, you can flexibly and easily develop your web application or server application, and publish it, just in your browser. https://paiza.cloud


Go/Revel Tutorial: How to create Go(golang) web framework Revel app in browser with PaizaCloud Cloud IDE

f:id:paiza:20180323134353p:plain
(Japanese article is here)

f:id:paiza:20151217152725j:plainHello, I'm Tsuneo!(@)

Go language(golang) have features like: - Standard library has many features including networking. - Easy to write concurrent programs. - Easy to manage executable files as it is only one file.

With these features, Go language is also getting popular for web development.

We can see the popularity from Google Trends below.

f:id:paiza:20180323105259p:plain From google trends

Although we can build web applications only by using Go's rich standard library, web application frameworks make it easier to develop the full-fledged web applications.

There are many Go web application frameworks like Revel, Echo, Gin, Iris, Revel is one of the most popular full-stack web application framework.

Go framework Revel has features for web development like routing, MVC, generator. By building the application following Revel rules, you can naturally create readable and extensible Web Applications. You can also use OR mapper library like Gorm with the Revel.

But, to develop Revel application in practice, you need to install and setup Go, Revel, Gorm, or databases. These installation and setting up can be frustrating. Just following the installation instruction does not work or cause errors because of OS, versions, other software dependencies, etc.

Also, if you publish the service, feedback from your friends or others will motivate you. But, this requires "deployment" of the service. The "deployment" also frustrates us...

So, here comes PaizaCloud Cloud IDE, a browser-based online web and application development environment.

As PaizaCloud have Go/Revel application development environment, you can just start coding for the Go/Revel application program in your browser.

And, as you can develop in the cloud, you can just run the Go/Revel application on the same machine without setting up another server and deploying to it.

Here, we develop a Task List application using Go and Revel on the PaizaCloud Cloud IDE.

Following the instruction below, you'll create and run the Google Home application just in 10 minutes.

Getting started with PaizaCloud Cloud IDE

So, here is the website of PaizaCloud Cloud IDE.

https://paiza.cloud/

Just sign up with email and click a link in the confirmation email. You can also sign up with GitHub or Google.

Create new server

Let's create a new server for the development workspace.

f:id:paiza:20171214154558p:plain

Click "new server" to open a dialog to set up the server.

Here, you can choose "PHP", "phpMyAdmin", and "MySQL", and click "New Server" button.

f:id:paiza:20171214154330p:plain

Just in 3 seconds, you'll get a browser-based development environment for Go and Revel.

You'll see editor or browser windows in the page, but we can close those for now.

Setup environment

Let's set up the environment. As PaizaCloud already have Go language or MySQL installed, you can just run "go get" command to install additional packages.

On PaizaCloud Cloud IDE, you can use PaizaCloud's "Terminal" application to run the commands in your browser.

Let's click the "Terminal" button at the left side of the page.

f:id:paiza:20171214154805p:plain

Now, the "Terminal" application launch. So, let's type "go get [package name]" command in the Terminal.

The '[package name]' is the name of the package to install. Here, we install packages for Revel and Gorm.

So, lets type:

$ go get github.com/revel/revel
$ go get github.com/revel/cmd/revel
$ go get github.com/jinzhu/gorm
$ go get github.com/go-sql-driver/mysql

f:id:paiza:20180323105536p:plain

Now, we have installed the packages to "~/go/bin" .

Create an application

Then, let's create your Go/Revel application.

You can use "revel new" command to create Go/Revel application.

On PaizaCloud Cloud IDE, you can use PaizaCloud's "Terminal" application to run the commands in your browser.

Let's click the "Terminal" button at the left side of the page.

f:id:paiza:20171214154805p:plain

Now, the "Terminal" application launch. So, let's type "revel new [application name]" command in the Terminal.

The '[application name]' is the name of the application you are creating. You can choose whatever you want, like "music-app" or "game-app".

Here, I'll choose the application name "myapp", where I can manage the Task List.

So, lets type:

$ revel new myapp

f:id:paiza:20180323111349p:plain

In the file manager view at the left side of the page, you'll see the "go/src/myapp" directory. Click the folder to open it to see inside the directory.

f:id:paiza:20180323110203p:plain

You'll see a bunch of files for the Go/Revel application.

Start Revel server

Now, you can already run the application. Let's start the application.

Change the directory by typing "cd ~/go" command, and type "revel run myapp" command to start the server!

$ cd ~/go
$ revel run myapp

f:id:paiza:20180323111505p:plain

You'll get a new button with text "9000" on the left side of the page.

f:id:paiza:20180323111533p:plain

Revel server runs on port 9000. PaizaCloud Cloud IDE detects the port number(9000), and automatically adds the button to open a browser for the port.

Click the button, and you'll get Browser application(a Browser application in the PaizaCloud). Now, you'll see web page about the Revel, that is your application!

f:id:paiza:20180323111629p:plain

(Although Revel runs as HTTP server, PaizaCloud can convert from HTTP to HTTPS.)

Editing file

What you see on the application page is an HTML file "~/go/src/myapp/app/views/App/Index.html". Let's try to change the title by editing the file.

On file manager view, double-click the file "~/go/src/myapp/app/views/App/Index.html" for editing.

f:id:paiza:20180323111814p:plain

Edit the title part by replacing 'It works!' like below:

go/src/myapp/app/views/App/Index.html:

      <h1>Hello Go and Revel!</h1>

f:id:paiza:20180326143312p:plain

After the editing, click "Save" button or type "Command-S", or "Ctrl-S" to save the file.

If the server is not running, start the server by typing:

$ revel run myapp

The, click the browser icon with text "9000" on the left-side of the page. If you already have the running browser, click reload button.

f:id:paiza:20180326143503p:plain

You got the message you just wrote on the page!

Create database

You'll already have a MySQL server running because you checked it on the server setting. But if not, you can always manually start like:

$ sudo systemctl enable mysql
$ sudo systemctl start mysql

On PaizaCloud Cloud IDE, you can install packages on root privilege.

Next, create a database for the application. Here, we create a database "mydb" using "mysql" command. Type the command below to create the "mydb" database.

$ mysql -u root
create database mydb;

f:id:paiza:20180216010049p:plain

You created the database.

Then, set the application to use the database. Database configuration file is "conf/app.conf" under the project directory.

Setting for development mode can be written in "[dev]" section. Database settings can be written as "db.info = [DB user]:[DB password]@/[DB name]?[DB options]"

Here, we set DB user as "root", empty password, DB name as "mydb", and some options. So we write the "db.info" setting like below under "[dev]" section.

go/src/myapp/conf/app.conf:

[dev]
db.info = root:@/mydb?charset=utf8&parseTime=True

Then, we create a file "app/controllers/gorm.go" to write code to use the database.

On file manager view, right-click "go/src/myapp/app/controllers" directory to open the context menu, and choose "New File" menu.

f:id:paiza:20180326143634p:plain

Input filename as "gorm.go", and click "Create" button to create the file.

f:id:paiza:20180326143715p:plain

An editor opens, let's write the code like below:

go/src/myapp/app/controllers/gorm.go:

package controllers

import (
    _ "github.com/go-sql-driver/mysql"
    "github.com/jinzhu/gorm"
    "github.com/revel/revel"
    "myapp/app/models"
    "log"
    )

var DB *gorm.DB

func InitDB() {
    dbInfo, _ := revel.Config.String("db.info")
    db, err := gorm.Open("mysql", dbInfo)
    if err != nil {
        log.Panicf("Failed gorm.Open: %v\n", err)
    }

    db.DB()
    db.AutoMigrate(&models.Post{})
    DB = db
}

After the editing, click "Save" button or type "Command-S", or "Ctrl-S" to save the file.

Let's see the code.

On "InitDB()" function, it reads the DB settings from "db.info" line of the configuration file, and open the database using Gorm library. Then, "db.AutoMigrate()" creates a table from Post model we'll create later. It assigns the database handle to "DB" variable so that other files can access the database as "controllers.DB".

Next, edit "app/init.go" to call the InitDB() function.

go/src/myapp/app/init.go:

package app

import (
  "github.com/revel/revel"
  "myapp/app/controllers"
)

...

func init() {
  ...
  revel.OnAppStart(controllers.InitDB)
}

...

There are two lines to add. The first change is to add "myapp/app/controllers" to "imports", and the second change is to add "revel.OnAppStart(controllers.InitDB)" at the end of init() function to call "InitDB()" on "germ.go" we just created.

Create table, model, etc.

Next, let's create a database table.

With Gorm library, we can manipulate the database using model information written in Go struct.

Here, we manipulate the "post" table stored Todo list information, using "Post" model.

We create the "Post" model on "app/models/post.go" file.

Right-click the "go/src/myapp/app" directory to open the context menu, and choose "New directory" menu, and create "models" directory. Right-click the "go/src/myapp/app/models" directory to open the context menu, and choose "New File" menu, and create "post.go" file. Then, edit the created "app/models/post.go" file like below.

go/src/myapp/app/models/post.go:

package models

type Post struct {
    Id  uint64 `gorm:"primary_key" json:"id"`
    Body string `sql:"size:255" json:"body"`
}

Let's see the code. "Post" struct have an integer type field "Id", and a string type field "Body". These represent "id" column and "body" column of the "posts" database table.

Exit and restart the server.

$ cd ~/go
$ revel run myapp

On the application startup, database migration is executed to create "posts" table. We can see the table data using "phpMyAdmin".

On browser on PaizaCloud, type "http://localhost/phpmyadmin/" on the URL field.

f:id:paiza:20180323132256p:plain

We can see the "posts" table. Here, we can add, edit or delete the database records.

Routing settings

The Todo List application has 3 actions: listing todos, adding a todo, or deleting a todo. We set 3 routing for those like below.

Method Path Action
GET /posts List tasks
POST /posts Add a task
DELETE /posts/{id} Delete a task

We set those routing on "routes/web.php" file. At first, remove all the default routings on the file. For about top page "/", set to redirect to "/tasks".

Edit "conf/routes" file like below.

go/src/myapp/conf/routes:

GET     /                                       Post.RedirectToPosts
GET     /posts                                  Post.Index
POST    /posts                                  Post.Create
POST    /posts/:id/delete                       Post.Delete

Let's see the code. "GET /" request calls RedirectToPosts method of Post controller. "GET /posts", "POST /posts", "POST /posts/:id/delete" requests calls "Index", "Create", "Delete" methods of Post controller. The controller methods can refer ":id" part as a parameter.

Controller settings

Create a Post controller referred by the router as "app/controllers/post.go".

Right-click the "app/controllers" directory to open the context menu, and choose "New file" to create "post.go" file.

Define Index(), Create(), Delete() methods for listing, adding, deleting todos.

go/src/myapp/app/controllers/post.go:

package controllers

import (
    "github.com/revel/revel"
    "myapp/app/models"
    "errors"
)

type Post struct {
    *revel.Controller
}

func (c Post) Index() revel.Result {
    posts := []models.Post{}

    result := DB.Order("id desc").Find(&posts);
    err := result.Error
    if err != nil {
        return c.RenderError(errors.New("Record Not Found"))
    }
    return c.Render(posts)
}
func (c Post) Create() revel.Result {
    post := models.Post{
        Body: c.Params.Form.Get("body"),
    }
    ret := DB.Create(&post)
    if ret.Error != nil {
        return c.RenderError(errors.New("Record Create failure." + ret.Error.Error()))
    }
    return c.Redirect("/posts")    
}
func (c Post) Delete() revel.Result {
    id := c.Params.Route.Get("id")
    posts := []models.Post{}
    ret := DB.Delete(&posts, id)
    if ret.Error != nil {
        return c.RenderError(errors.New("Record Delete failure." + ret.Error.Error()))
    }
    return c.Redirect("/posts")    
}

func (c Post) RedirectToPosts() revel.Result {
    return c.Redirect("/posts")    
}

Let's see the code.

Add "myapp/app/models" to "import" so that we can access the Post model. Create Post controller at "type Post struct".

"func (c Post) Index() revel.Result" is a Index() method of the Post controller to return the Todo list. "posts := []models.Post{}" create "posts", an array of Post model. 'DB.Order("id desc").Find(&posts)' retrieve all the "posts" table records, and store them to the "posts" array. Then, if there is no error, call Render() method to create the HTML file. The HTML file is created from the HTML template we will create later on. By setting "posts" to Render() argument, the template file can refer the "posts" table.

"func (c Post) Create() revel.Result" is Create() method of the Post controller to create a Todo. "models.Post{...}" creates a model, retrieve the "body" parameter of the submitted form using "c.Params.Form.Get()", and set it to "Body" field of the model. "DB.Create(&post)" create a database record from the model. Then, redirect to the Todo list page using 'c.Redirect("/posts")'.

"func (c Post) Delete() revel.Result" is a Delete() method of the Post controller to delete a todo. 'c.Params.Route.Get("id")' get the ":id" part of the URL: "/posts/:id/delete". "DB.Delete(&posts, id)" deletes an record of the "id". Then, 'c.Redirect("/posts")' redirects to the Todo list page.

"func (c Post) RedirectToPosts() revel.Result" is to redirect from the top page to Todo list page.

Create HTML template

Next, let's create HTML a template. An HTML template is an HTML file with embedded code.

Create an HTML template file to list, add, and delete Todo as "app/views/Post/index.html".

Right-click "go/myapp/app/views" directory to open the context menu, choose "New Directory" menu, and create "Post" directory. Right-click "go/myapp/app/views/Post" directory to open the context menu, choose "New File" menu, and create "index.html" file.

Edit the created "app/views/Post/index.html" file as below.

go/myapp/app/views/Post/index.html:

{{set . "title" "Todo list"}}
{{template "header.html" .}}

<header class="jumbotron" style="background-color:#A9F16C">
  <div class="container">
    <div class="row">
      <h1>Todo list</h1>
      <p></p>
    </div>
  </div>
</header>

<div class="container">
  <div class="row">
    <div class="span6">
      {{template "flash.html" .}}
    </div>
  </div>
</div>

<div class="container">
    <form action="/posts" method="post">
        <div class="form-group">
            <div class="row">
                <label for="todo" class="col-xs-2">Todo</label>
                <input type="text" name="body" class="col-xs-8">
                <div class="col-xs-2">
                    <button type="submit" class="btn btn-success">
                        <i class="fa fa-plus"></i> Add Todo
                    </button>
                </div>            
            </div>
        </div>
    </form>

    <h2>Current Todos</h2>
    <table class="table table-striped todo-table">
        <thead>
            <th>Todos</th><th>&nbsp;</th>
        </thead>

        <tbody>
            {{ range .posts }}
                <tr>
                    <td>
                        <div>{{ .Body }}</div>
                    </td>
                    <td>
                        <form action="/posts/{{.Id}}/delete" method="post">
                            <button class="btn btn-danger">Delete</button>
                        </form>
                    </td>
                </tr>
            {{ end }}
        </tbody>
    </table>
    
</div>


{{template "footer.html" .}}

Let's see the template file. On the HTML template, a part between "{{" and "}}" is to describe actions which creates HTML.

'{{set . "title" "Todo list"}}' sets "title" variable as "Todo list".

'{{template "header.html" .}}' creates HTML file from a template file "header.html". By calling other HTML templates like this, we can share common parts for multiple template files as the one template file. Here, "header.html" have common HTML header part.

'<form action="/posts" method="post">' is to create a Todo form.

'<input type="text" name="body" class="col-xs-8">' shows a text input form to input a Todo. Set form name to "body" so that "body" parameter of the submitted request has the inputted Todo.

The part between '{{ range .posts }}' and '{{ end }}' is read through posts array, and create HTML from HTML template inside repeatedly for each post.

'{{ .Body }}' shows the "Body" field of each post. '{{.ID}}' shows the Id field of each post.

And, '{{template "footer.html" .}}' shows the HTMP footer from the "footer.html" template.

Run the application

Now, we wrote all the code. Let's see.

Click the browser icon(9000) to open the browser in PaizaCloud.

We see the "Task List" page with the empty task.

Let's add or delete the tasks.

f:id:paiza:20180326144011p:plain

It works! We successfully created the Task List application with Go/Revel!

Note that on PaizaCloud free plan, the server will be suspended. To run the bot continuously, please upgrade to the BASIC plan.

Summary

With PaizaCloud Cloud IDE, we created a Go/Revel application just in your browser, without installing or setting up any development environments. We can even publish the application just on the PaizaCloud. Now, let's create your own Go/Revel application!


With「PaizaCloud Cloud IDE」, you can flexibly and easily develop your web application or server application, and publish it, just in your browser. https://paiza.cloud


Django2.0 Tutorial - How to create Django2.0 ToDo app in browser with PaizaCloud Cloud IDE

f:id:paiza:20180228111025p:plain
(English article is here)

f:id:paiza:20151217152725j:plainHello, I'm Tsuneo!(@)

Python is one of the most popular programing languages. With libraries for machine learning, Python is getting more popular.

Python is a script language. As the Python code can run from one line, it is quite suitable for learning programming. Actually, there is a data that Python is the most popular language to teach in the US universities.

To develop web application with Python, there are several web application frameworks like Django, Pyramid, Flask, Bottle, etc. But among that, Django is obviously the most famous web application framework in Python.

Django is a full stack web application framework with MVC, ORM, generator, etc. By following Django way, you can easily build a well-structured web application.

The latest Django2.0 was just released on Dec 2017. It used to be bothering to think which of Python2 or Python3 to use. But, now, as Django2.0 only support Python3.0, there is nothing to worry about Python version. Now is the good time to start Django!

But, to develop Django application in practice, you need to install and setup Python, Django, or databases. These installation and setting up can be frustrating. Just following the installation instruction does not work or cause errors because of OS, versions, other software dependencies, etc.

Also, if you publish the service, feedbacks from your friends or others will motivate you. But, this requires "deployment" of the service. The "deployment" also frustrates us...

So, here comes PaizaCloud Cloud IDE, a browser-based online web and application development environment.

As PaizaCloud have Django application development environment, you can just start coding for the Django application program in your browser.

And, as you can develop in the cloud, you can just run the Django application on the same machine without setting up another server and deploying to it.

Here, we develop a Todo List application using Django2.0 on the PaizaCloud Cloud IDE.

Following the instruction below, you'll create and run the Django2.0 application just in 10 minutes.

Getting started with PaizaCloud Cloud IDE

So, here is the website of PaizaCloud Cloud IDE.

https://paiza.cloud/

Just sign up with email and click a link in the confirmation email. You can also sign up with GitHub or Google.

Create new server

Let's create a new server for the development workspace.

f:id:paiza:20171214154558p:plain

Click "new server" to open a dialog to set up the server.

Here, you can choose "phpMyAdmin", and "MySQL", and click "New Server" button.

f:id:paiza:20180306171813p:plain

Just in 3 seconds, you'll get a browser-based development environment for Django.

You'll see editor or browser windows in the page, but we can close those for now.

Create an application

Then, let's create your Django application.

You can use "django-admin startproject" command to create Ruby on Rails application.

On PaizaCloud Cloud IDE, you can use PaizaCloud's "Terminal" application to run the commands in your browser.

Let's click the "Terminal" button at the left side of the page.

f:id:paiza:20171214154805p:plain

Now, the "Terminal" application launch. So, let's type "django-admin startproject [project name]" command in the Terminal.

Here, I'll choose the project name "myapp", where I can manage the Todo List.

So, lets type:

$ django-admin startproject mysite

f:id:paiza:20180228111313p:plain

In the file manager view at the left side of the page, you'll see the "mysite" directory. Click the folder to open it to see inside the directory.

f:id:paiza:20180228111355p:plain

You'll see a bunch of files for the Django application.

Editing file

To run Django on PaizaCloud, you need to edit a file "setting.py". On file manager view, double-click the file "mysite/mysite/settings.py" for editing.

f:id:paiza:20180228111523p:plain

Edit the line "ALLOWED_HOST = []" as following.(By this setting, you can connect the application with host name other than "localhost". Even if you change the line, for the server listening on "127.0.0.1", other than the owner user of the server cannot connect to the server.)

ALLOWED_HOSTS = ['*']

f:id:paiza:20180306172249p:plain

After the editing, click "Save" button or type "Command-S", or "Ctrl-S" to save the file.

Start Django server

Now, you can already run the project. Let's run the project!

Change the directory by typing "cd mysite" command, and type "python3 manage.py runserver" command to start the server!

$ cd mysite
$ pyhton3 manage.py runserver

f:id:paiza:20180228111743p:plain

You'll get a new button with text "8000" on the left side of the page.

f:id:paiza:20180216005220p:plain

Django server runs on port 8000. PaizaCloud Cloud IDE detects the port number(8000), and automatically adds the button to open a browser for the port.

Click the button, and you'll get Browser application(a Browser application in the PaizaCloud). Now, you'll see web page about the Laravel, that is your application!
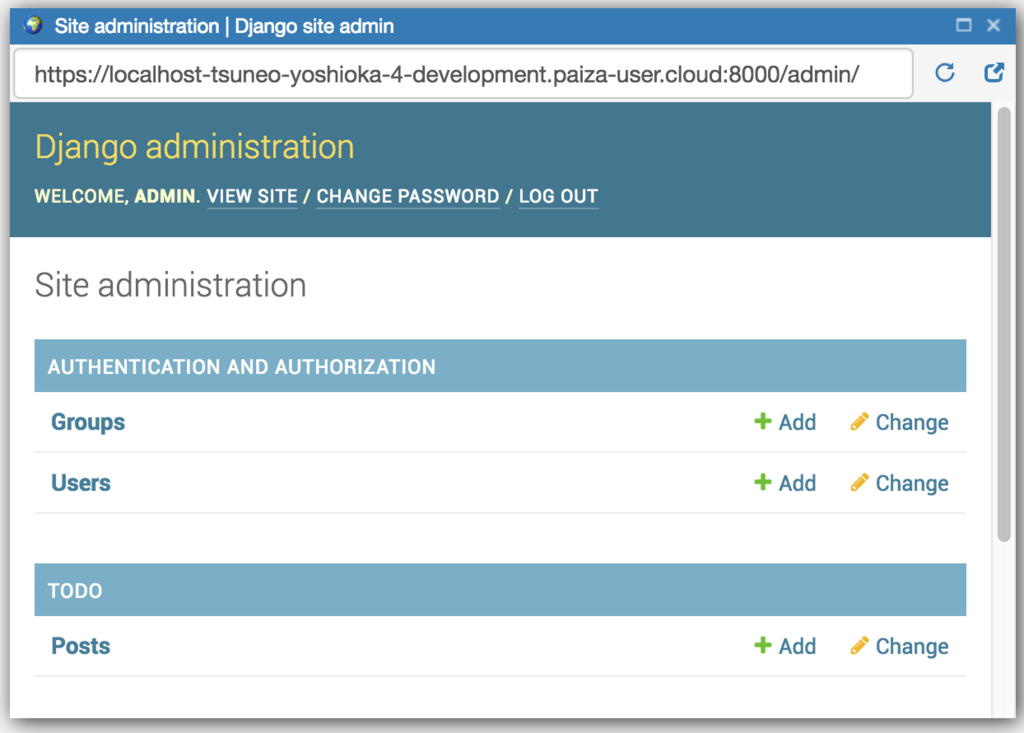
f:id:paiza:20180228111912p:plain

If you see the error message "DisallowedHost at /, Invalid HTTP_HOST header" on the page, check that "mysite/mysite/settings.py" have a line "ALLOWED_HOSTS = ['*']".
f:id:paiza:20180228111834p:plain

Note: While the Django server runs as an HTTP server, PaizaCloud convert it to HTTPS. And, while the server runs on localhost("127.0.0.1"), PaizaCloud allowed us to access the server with URL "https://localhost-SERVERNAME.paiza-user.cloud:PORT/" .

Creating appliation

On Django, a project has applications as sub directories so that we can have multiple applications on one project.

Let's create an application. We use the command "python3 manage.py startapp" to create the application. Here, we create an application named "todo".

Open the Terminal on PaizaCloud, and run the command below on the project directory("mysite") to create the application.

$ python3 manage.py startapp todo

f:id:paiza:20180228112031p:plain

The directories and files for the application are created. Let's see using the file manager view.

f:id:paiza:20180228112309p:plain

Show a message

At first, we'll show a message on the application. The page view is created on the file "mysite/todo/views.py". So, let's edit the file.

On file management view, double-click the file to edit.

f:id:paiza:20180228112428p:plain

Edit the file as below to show the message "Hello Django World".

mysite/todo/views.py:

from django.http import HttpResponse


def index(request):
    return HttpResponse("Hello Django world!")

f:id:paiza:20180306172609p:plain

After the editing, click "Save" button or type "Command-S", or "Ctrl-S" to save the file.

On Django, the action to show the page is created as a view function. The view function returns the contents of the page. To show the simple text, we can use "HttpResponse()" function to specify the message to show.

Then, we create a file "urls.py" to set the relations(routings) between URL and view function. The URL routing file for the ToDo application is "mysite/todo/urls.py".

Let's create the file "mysite/todo/urls.py". On PaizaCloud file management view, right-click the directory "mysite/todo", and choose "New File" menu.

f:id:paiza:20180306172656p:plain

As the file creation dialog is shown, create the file with name "urls.py".

f:id:paiza:20180306172727p:plain

Edit the created "mysite/todo/urls.py" as below.

mysite/todo/urls.py:

from django.urls import path

from . import views

urlpatterns = [
    path('', views.index, name='index'),
]

Let's see the code. On "urlpatterns" list, we call path() function to set URL, view function, and the name of the routing. Here, we set ''(empty string) to URL, "index" function to the view function, and the name to the "index".

Next, to use the application on the project, set the URL routing for the project. URL routing file for the project is "mysite/urls.py", so let's edit the file.

mysite/urls.py:

from django.urls import include, path
from django.contrib import admin
from django.views.generic import RedirectView

urlpatterns = [
    path('todo/', include('todo.urls')),
    path('admin/', admin.site.urls),
    path('',  RedirectView.as_view(url='/todo/')),
]

Let's see the code. On the first item of the "urlpatterns" list, we set the routing for the path '/todo' to "include('todo.urls')" so that the routing settings under '/todo' path can be specified on the file "mysite/todo/urls.py".

On the third item, we set to redirect the top page('/') to "/todo". We use "RedirectView.as_view()" function to set the redirection. We are importing the RedirectView on the third line.

Then, to use the application on the project, edit the settings file("mysite/mysite/settings.py") to add "todo.apps.TodoConfig" to the INSTALLED_APPS list.

mysite/mysite/settings.py

INSTALLED_APPS = [
    'todo.apps.TodoConfig',
    'django.contrib.admin',
    'django.contrib.auth',
    'django.contrib.contenttypes',
    'django.contrib.sessions',
    'django.contrib.messages',
    'django.contrib.staticfiles',
]

Now, the application settings are done. Let's run the application.

If you have not run the server, type command below to start the server.

$ python3 manage.py runserver

Click the browser icon with text "8000" on the left side of the page.

f:id:paiza:20180228113053p:plain

The message is shown! You application creating is running successfully!

Create database

By default, Django uses SQLite as a database. So, you don't need to set up for the database. Now, let's use the more practical database MySQL. (You can skip the setting if you use SQLite.)

You'll already have a MySQL server running because you checked it on the server setting. But if not, you can always manually start like:

$ sudo systemctl enable mysql
$ sudo systemctl start mysql

On PaizaCloud Cloud IDE, you can install packages on root privilege.

Next, create a database for the application. Here, we create a database "mydb" using "mysql" command. Type the command below to create the "mydb" database.

$ mysql -u root
create database mydb;

f:id:paiza:20180216010049p:plain

You created the database.

Then, set the application to use the database.

Database configuration can be set on "mysite/mysite/settings.py".

Open and edit the file to change database engine from SQLite to MySQL. Don't forget to add "import pymysql", "pymysql.install_as_MySQLdb()" to use the MySQL.

mysite/mysite/settings.py:

# Database
# https://docs.djangoproject.com/en/2.0/ref/settings/#databases
import pymysql
pymysql.install_as_MySQLdb()

DATABASES = {
#    'default': {
#        'ENGINE': 'django.db.backends.sqlite3',
#        'NAME': os.path.join(BASE_DIR, 'db.sqlite3'),
#    }
    'default': {
        'ENGINE': 'django.db.backends.mysql',
        'NAME': 'mydb',
        'USER': 'root',
        'PASSWORD': '',
        'HOST': '127.0.0.1',
        'PORT': '3306',
    }
}

Create table, model, etc.

Now, let's make application to use the database.

On Django, we can create the table using migration file.

By explicitly writing the table structure on the file, we can easily check, change the table structure and re-create, rollback the table.

Let's create the migration file.

At first, create a Model file for the table. With the model, we can access table column just like a variable.

Edit the file "mysite/todo/models.py" to create the model.

mysite/todo/models.py:

from django.db import models


class Post(models.Model):
    body = models.CharField(max_length=200)

Here, we create Post class with "body" text field related to the "post" table.

Next, run the following command to create the migration file from the model.

$ python3 manage.py makemigrations todo

Then, execute the migration file.

$ python3 manage.py migrate

The "post" table is created, we can also see the database table on "phpMyAdmin".

On the browser on PaizaCloud, type "http://localhost/phpmyadmin/" to open the "phpMyAdmin".

f:id:paiza:20180228120501p:plain

Django management server

Django has a built-in database management UI. Let's use it.

At first, create a management account with commands below.

$ python3 manage.py createsuperuser
Username: admin
Email address: admin@example.com
Password: **********
Password (again): *********
Superuser created successfully.

Then, edit the "admin.py" file to allow the management server to access the "post" table created.

mysite/todo/admin.py:

from django.contrib import admin
from .models import Post

admin.site.register(Post)

Let's open the management UI, open the browser on PaizaCloud and type URL "http://localhost:8000/admin/".

f:id:paiza:20180228114500p:plain

As we can see the login page, login using the admin account created.

f:id:paiza:20180228114646p:plain

The management UI is open! We can edit the table here.

f:id:paiza:20180228114918p:plain

Routing settings

On the ToDo list, we have 3 actions: listing ToDos, adding ToDo, deleting ToDo. We assign the routings for those actions like below.

Method Path Action
GET /todo List ToDos
POST /todo/create Add a ToDo
POST /todo/<int:id>/delete Delete a ToDo

We set the routing on "mysite/todo/urls.py" like below.

mysite/todo/urls.py:

from django.urls import path

from . import views

app_name = 'todo'

urlpatterns = [
    path('', views.index, name='index'),
    path('create', views.create, name='create'),
    path('<int:id>/delete', views.delete, name='delete'),
]

Let's see the code. "app_name" need to set to the ToDo application name('todo').

On "urlpatterns" list, we set the routings. On the first item, we set the path '/todo' to call "index" function of "mysite/views.py". On the second item, we set the path '/todo/create' to call "create" function of "mysite/views.py". On the third item, we set the path '/todo/<int:id>' to call "delete" function of "mysite/views.py". By writing the part of the path like "<int:id>'", we can retrieve the part from the program. For example, for the path "/todo/1", we can get the "1" as variable "id".

View settings

Let's write the view code called from the routing. Write functions for listing, adding, and deleting the item as index(), store() and destroy().

mysite/todo/views.py

from django.shortcuts import render, get_object_or_404
from django.http import HttpResponseRedirect, HttpResponse
from django.urls import reverse
from .models import Post
from .forms import PostForm

# Create your views here.
def index(request):
    posts = Post.objects.all()
    form = PostForm()
    context = {'posts': posts, 'form': form, }
    return render(request, 'todo/index.html', context)
    
def create(request):
    form = PostForm(request.POST)
    form.save(commit=True)
    return HttpResponseRedirect(reverse('todo:index'))

def delete(request, id=None):
    post = get_object_or_404(Post, pk=id)
    post.delete()
    return HttpResponseRedirect(reverse('todo:index'))

Let's see the code. On line 4 and 5, we import the model and form class from "models.py", "forms.py".

On the index() function, we call the Post.objects.all() function to retrieve all the ToDo items from the database. The retrieved data is set to the dictionary "context" with the key "posts" so that HTML templates can access the ToDo list as "posts" variable. On the "form" key, we set the empty PostForm object as a value for the submitting form.

On the create() function, we create a PostForm object from the parameter submitted, and call form.save() to save the data to the database. Then, we redirect the request to '/todo' for listing ToDos. We use HttpResponseRedirect() for the redirection. We use reverse() function to convert from the routing name to the URL.

On the delete() function, we call get_object_or_404() function to retrieve the object for the ToDo ID(id). We use post.delete() to delete the object, and redirect to '/todo' like create() method.

Creating HTML template

Then, let's create HTML templates. On HTML templates, we embed the code on the HTML file.

The HTML file can be written in one file. But, as it is more easy to have a common layout file for multiple template files, we create the layout file.

We create the layout file as "mysite/todo/templates/todo/base.html".

On file management view, right-click the directory "mysite/todo", and choose "New Directory" menu, and create the directory with the name "templates".

Next, right-click the directory "mysite/todo/templates" and choose "New Directory", and create the directory with name "todo".

Then, right-click the "mysite/todo/templates/todo" directory and choose "New file" menu, and create the file with name "base.html".

Edit the created layout file like below.

mysite/todo/templates/todo/base.html:

{% load staticfiles %}
<!DOCTYPE html>
<html>
    <head>
        <title>Todo List</title>
        <!-- CSS And JavaScript -->
        <link rel="stylesheet" href="//fonts.googleapis.com/css?family=Roboto:300,300italic,700,700italic">
        <link rel="stylesheet" href="//cdn.rawgit.com/necolas/normalize.css/master/normalize.css">
        <link rel="stylesheet" href="//cdn.rawgit.com/milligram/milligram/master/dist/milligram.min.css">
        <link rel="stylesheet" href="{% static 'css/todo.css' %}">
    </head>
    <body>
        <div class="container">
            {% block content %}
            {% endblock %}
        </div>
    </body>
</html>

Let's see the file. We use the simple CSS framework "Milligram" to make the HTML more beautiful. Milligram allows us to make the HTML beautiful without adding CSS class names.

On the body tag, we see "{% block content %}{% endblock %}". Here is the placeholder replaced with each page templates.

Next, let's create an HTML template "mysite/todo/templates/todo/index.html" for listing, adding, and deleting ToDos.

Right-click a directory "mysite/todo/templates/todo", and choose "New File" menu, and create a file with name "index.html". Edit the file like below.

mysite/todo/templates/todo/index.html:

{% extends 'todo/base.html' %}

{% block content %}
    <h1>Todo List</h1>

    {% if error_message %}<p><strong>{{ error_message }}</strong></p>{% endif %}
    <form action="{% url 'todo:create' %}" method="post">
        {% csrf_token %}
        <!-- Todo Name -->
        <div class="form-group">
            <label for="todo" class="col-sm-3 control-label">Todo</label>
            <div class="col-sm-6">
                {{ form.body }}
            </div>
        </div>

        <!-- Add Todo Button -->
        <div class="form-group">
            <div class="col-sm-offset-3 col-sm-6">
                <button type="submit" class="btn btn-default">
                    <i class="fa fa-plus"></i> Add Todo
                </button>
            </div>
        </div>

    </form>
    

    <!-- Current Todos -->
    <h2>Current Todos</h2>
    <table class="table table-striped todo-table">
        <thead>
            <th>Todos</th><th>&nbsp;</th>
        </thead>

        <tbody>
            {% for post in posts %}
                <tr>
                    <!-- Todo Name -->
                    <td>
                        <div>{{ post.body }}</div>
                    </td>
                    <td>
                        <form action="{% url 'todo:delete' post.id %}" method="post">
                            {% csrf_token %}
                            <button>Delete</button>
                        </form>
                    </td>
                </tr>
            {% endfor %}
        </tbody>
    </table>
    
{% endblock %}

Let's see the HTML template.

The line "{% extends 'todo/base.html' %}" specify to use the layout file('todo/base.html').

The contents between "{% block content %}" and "{% endblock content %}" is for the page contents. The contents replace the "{% block content %}{% endblock %}" part of the layout file("todo/base.html").

The first form is for adding to ToDo. On Django, the form need to have like "{% csrf_token %}" to protect from CSRF attack.

The "input" tag can be generated by writing the field of PostForm object like "{{ form.body }} ". The like will generate the input form like '<input type="text" name="body" id="id_body" maxlength="200">'.

The form is set to submit to "POST /todo".

On the ToDo listing, we can use "posts" list to access the ToDo items. By writing "{% for post in posts %} ... {% endfor %}", we can set each ToDo item to "post" variable.

"{{ post.body }}" is the Django HTML template format to show the contents of "{{}}". Here, we are accessing "body" property of the "post" object to show the "body" column on the database.

On the "Delete" button, we call "POST /todo/{id}/delete" to delete the specified task.

Creating Model Form

To handle a submitting form, we create a model form class "PostForm".

Create a file "mysite/todo/forms.py", and edit like below.

mysite/todo/forms.py:

from django import forms

from .models import Post

class PostForm(forms.ModelForm):
    class Meta:
        model = Post
        fields = ('body',)

The "field" property is set for the form fields.

Run the application

Now, we wrote all the code. Let's see.

Click the browser icon(8000) to open the browser in PaizaCloud.

We see the "ToDo List" page with the empty task.

Let's add or delete the ToDos.

f:id:paiza:20180306173021p:plain

It works! We successfully created the ToDo List application with Django2.0!

Summary

With PaizaCloud Cloud IDE, we created a Django2.0 application just in your browser, without installing or setting up any development environments. Now, let's create your own Django application!


With「PaizaCloud Cloud IDE」, you can flexibly and easily develop your web application or server application, and publish it, just in your browser. https://paiza.cloud